Developer-First GridPHP Docs: Live Demos & Instant Search
We’re excited to unveil a massive upgrade to the GridPHP Documentation & Developer Portal.
Building powerful, responsive PHP datagrids and CRUD interfaces should be fast, intuitive, and visually engaging. To make integrating GridPHP into your projects seamless, we’ve completely redesigned our documentation experience from the ground up.
⚡ Quick Summary (TL;DR)
What’s New in GridPHP Docs?
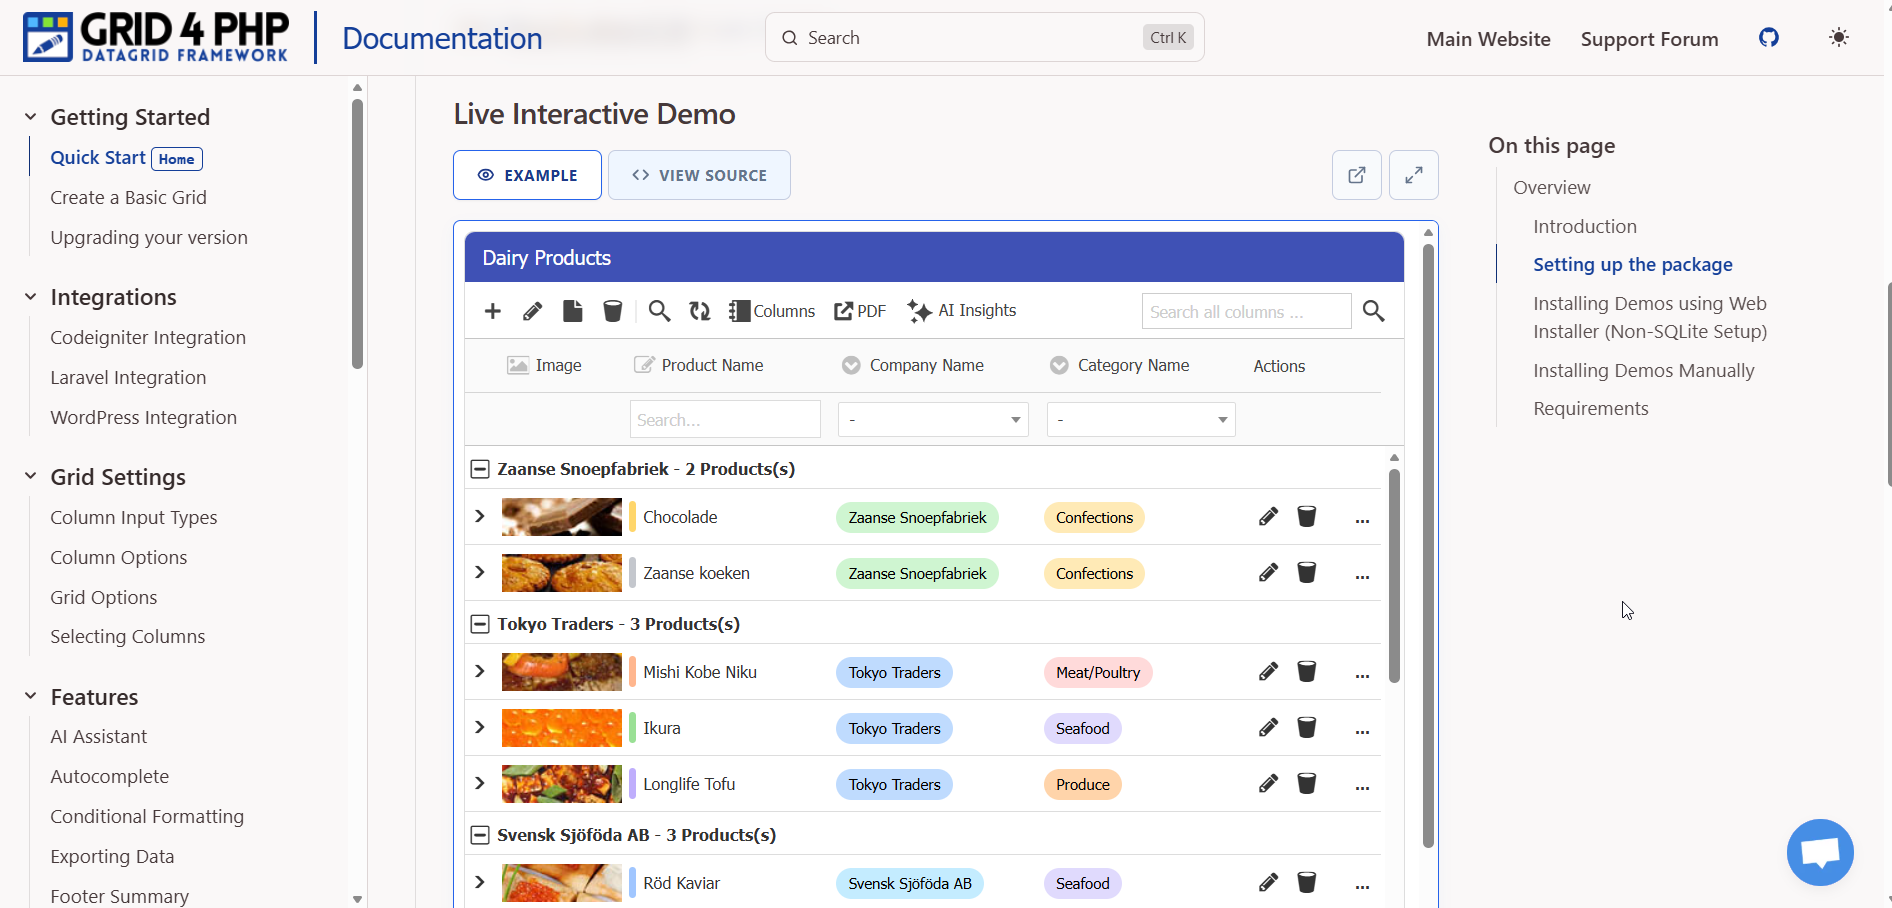
Interactive Live Demos: Run, test, and tweak datagrid features directly inside each documentation topic.
Modern, Rich UI: A sleek, developer-first interface designed for effortless reading, dark/light toggle clarity, and rapid searchability.
Enhanced Product Documentation: Deeper API references, step-by-step framework guides (Laravel, WordPress, CodeIgniter), and copy-paste code snippets.
🚀 Key Highlights of the Update
1. Interactive Demos Embedded in Every Section
Static code snippets only tell half the story. Every documentation section now features live, interactive GridPHP demos side-by-side with example code.
-
Hands-On Testing: Test inline editing, master-detail subgrids, dynamic filtering, conditional formatting, and AJAX file uploads in real time before writing a single line in your app.
-
Instant Parameter Tweaking: See how simple property settings and PHP options transform grid behavior immediately on the client side.
2. Sleek, Modern UI Built for Developers
Navigating complex API endpoints and configuration options should never feel clunky. Our redesigned portal features:
-
Clean Layout & Enhanced Readability: High-contrast syntax highlighting, streamlined navigation drawers, and structured visual hierarchies.
-
Fast In-Doc Search Engine: Find exact methods, hooks, or database configuration guides instantly using our upgraded search bar.
-
Mobile-Responsive & Modern Design: Designed with a clean aesthetic and quick load times so you can reference docs comfortably on any screen size.
3. Expanded & Deepened Product Guidance
We’ve revamped our entire library of tutorials and guides to reflect modern web development workflows:
-
Comprehensive CRUD & Master-Detail Guides: Deep-dive walkthroughs on multi-level parent-child relationships, subgrids, and custom database event handlers.
-
Framework Integration Blueprint: Updated step-by-step instructions for integrating GridPHP with Laravel, WordPress, and standard modern PHP setups.
-
Export & AI Insights Integration: Dedicated guides covering CSV/Excel/PDF export customization and utilizing built-in AI data analysis features.
🛠️ Get Started in 3 Simple Steps
Getting up and running with GridPHP takes less than 5 minutes:
composer create-project gridphp/gridphp-community gridphp-community-main

cd gridphp-community-main

php -S localhost:8000
💬 Explore the New Documentation Today
Whether you are building internal admin panels, SaaS dashboards, or complex database tools, our upgraded documentation is designed to save you hours of integration time.
Best Supabase Admin Panel Tools in 2026
TL;DR
A direct comparison of every Supabase admin panel option — tools, pricing, and the one that uses AI to build itself from your schema.
- Most Supabase admin panel tools are either expensive SaaS, require developer setup, or show raw database tables with no intelligence.
- Admin Pilot connects via URI, uses AI to analyze your schema,
- Predicts workflows, groups tables by domain, and renders
- Relationships as human-readable labels automatically.
Free during beta. No signup required.
👉 Launch the live demo
Why Supabase Project Needs a Backoffice?
You built the product. Now your support team needs to look up a customer. Your ops manager wants to check an order. Your investor wants a dashboard. And none of them have access to Supabase Studio — nor should they.
This is the moment every Supabase founder hits. And most of them waste weeks solving it.
Admin Pilot is a Supabase admin panel builder that generates a complete backoffice from your PostgreSQL connection string — no coding, no configuration, no developer required.
The Problem With Supabase Studio
Supabase Studio is brilliant — for developers. Raw table editor, SQL console, migration tools. It’s a developer cockpit, not a business tool.
Hand it to a non-technical team member and one of two things happens: they break something, or they can’t figure it out and come back to you anyway.
You need a backoffice — a clean, role-controlled interface your whole team can use safely. The question is which one.
What You Actually Need
Before comparing tools, be clear on what you’re solving:
- Non-technical team access — support, ops, finance, management
- Safe data editing — not raw SQL, not Supabase Studio
- Role control — not everyone should see or edit everything
- Your data stays yours — credentials shouldn’t live on someone else’s server
Keep these in mind as you read.
Which Supabase Admin Panel Should You Use?
Here’s an honest look at every major option:
| Tool | Setup | Pricing | AI Analysis | Self-host | Modern UI |
|---|---|---|---|---|---|
| Motor Admin | Fast | Free / OSS | ❌ | ✅ | ❌ |
| Forest Admin | Medium | SaaS $$$ | ❌ | Partial | ❌ |
| Bricks.sh | Fast | SaaS | ❌ | ❌ | ✅ |
| Flashboard | Fast | SaaS | ❌ | ❌ | ✅ |
| Refine | Slow | Free / OSS | ✅ | ✅ | ✅ |
| UI Bakery | Medium | SaaS $$$ | ✅ | Paid add-on | ✅ |
| Supamode | Medium | $297 one-time | ❌ | ✅ | ✅ |
| Admin Pilot | Instant | Free beta | ✅ | ✅ | ✅ |
Motor Admin — Free and open-source. Gets the job done for basic CRUD. But the UI feels like 2018, and there’s no intelligence — it just mirrors your tables as-is, raw IDs and all.
Forest Admin — Enterprise-grade with powerful permissions and smart actions. But it’s complex to configure, the pricing scales aggressively, and setup takes real effort.
Bricks.sh — Clean, modern interface. Auto-generates from your schema. SaaS only though — your credentials live on their servers, and you’re on a monthly subscription.
Flashboard — Great CMS angle, especially for content-heavy apps. But limited in relational data handling and team configuration options.
Refine — AI-powered code generation that produces real React apps. Impressive, but it’s a developer tool. You still need someone to build and maintain the output.
UI Bakery — Feature-rich low-code platform with 45+ integrations. SOC2 certified. But the pricing is enterprise-level, and self-hosting costs extra.
Supamode — Self-hosted with a one-time license fee. Full source code ownership. But $297 upfront, setup takes technical knowledge, and there’s no AI layer.
What’s Missing From Every Supabase Admin Panel?
After going through all of these, the same gaps keep appearing:
They show you a database. They don’t understand your business.
Raw foreign key IDs instead of names. No sense of which tables matter and which are internal. No understanding of what your team actually does with the data. You still have to manually configure everything — columns, relationships, labels, workflows.
And most are either expensive SaaS subscriptions (your data leaves your server) or complex self-hosted tools that need a developer to set up.
There had to be a better way.
Admin Pilot — Paste a URI. Get a Backoffice.
That’s the entire setup. One connection string.
One click. No configuration files, no deployment pipeline, no developer required.
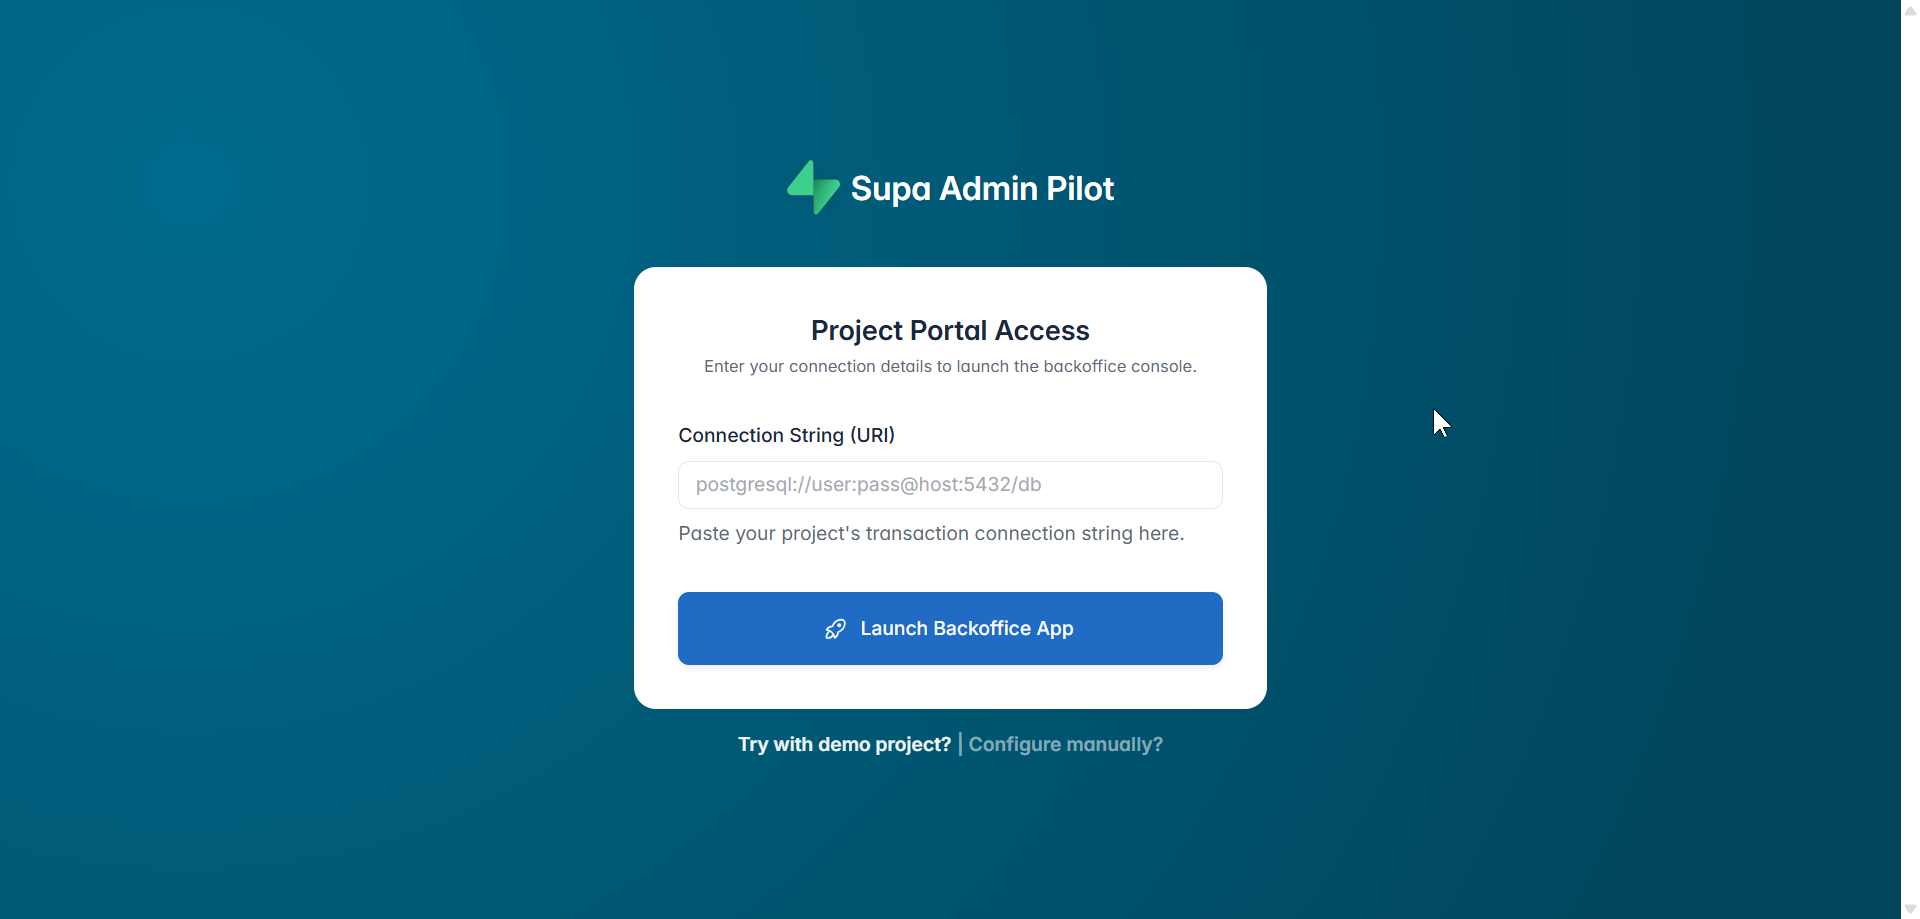
Here’s what happens in the background the moment you hit Launch Backoffice App:
↓  Discover Tables         — scans your full database structure
↓  Fetch Column Schema     — reads every column type, default, and constraint
↓  AI Schema Analysis      — detects relationships, selects the right UI widget per column
↓  Generate Project Name   — creates a branded name like "Commerce Console"
↓  Predict Workflows       — surfaces your team's most common actions automatically
↓  Save Configuration      — persists everything locally
↓  Your backoffice is live ✅

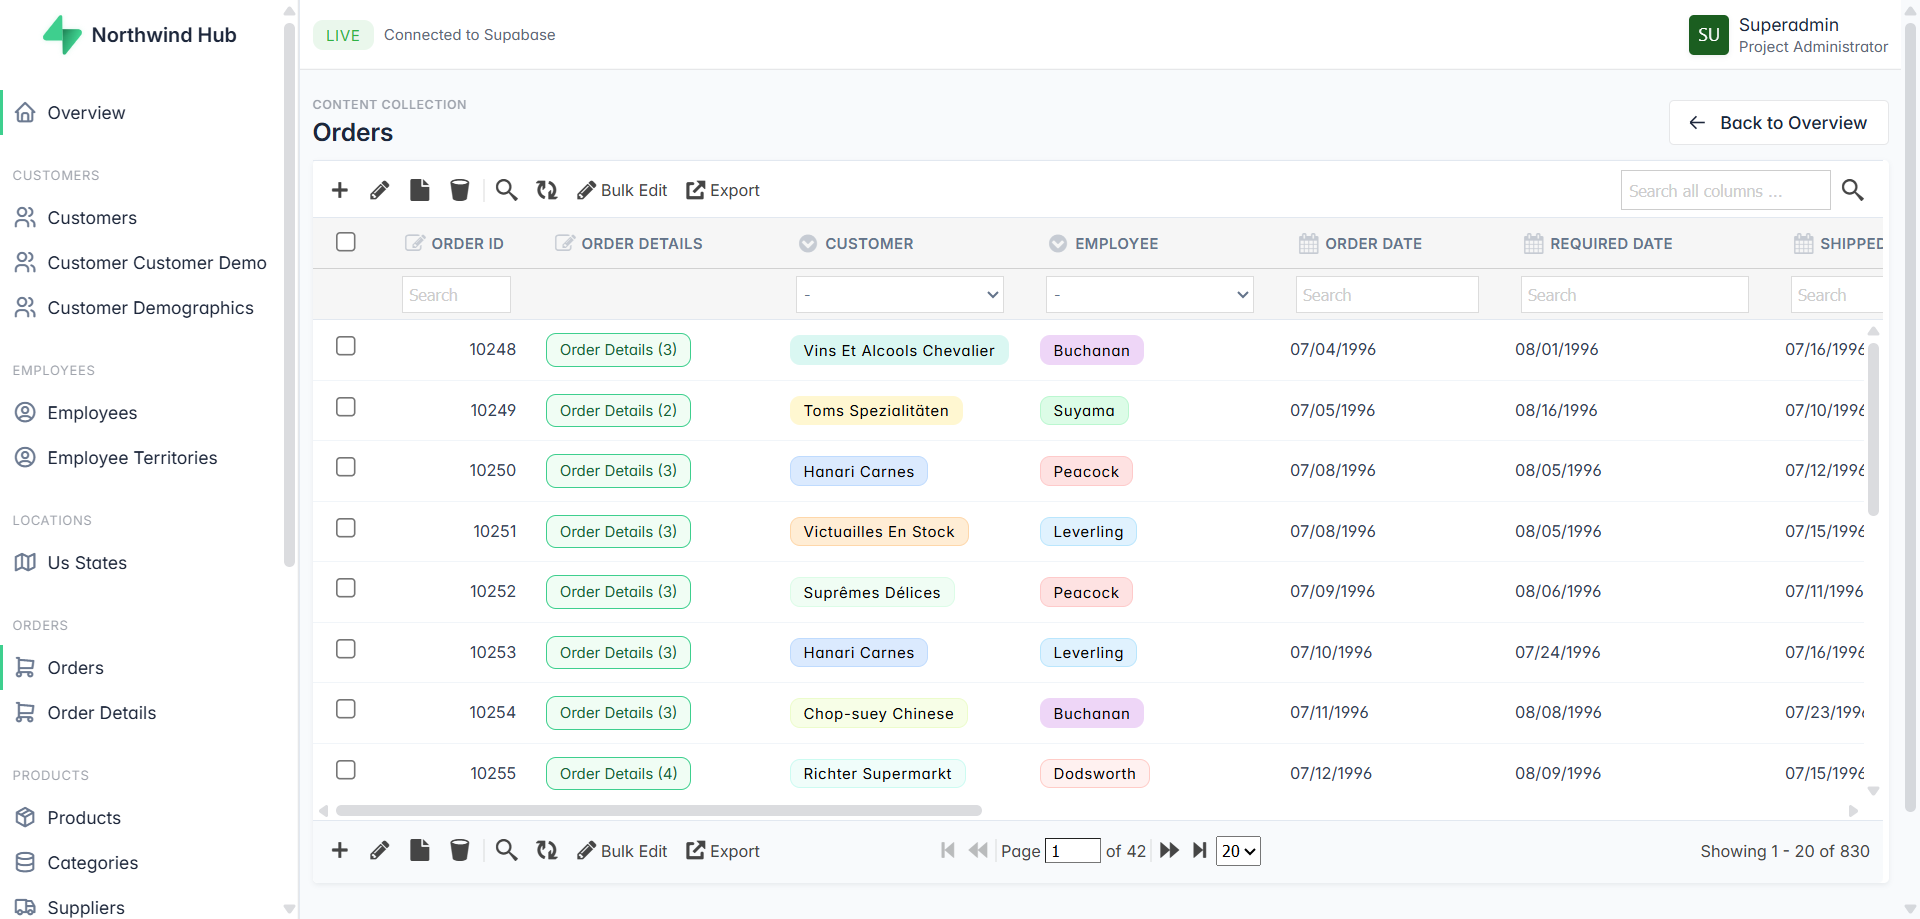
What you’re looking at above wasn’t configured. The AI read the database schema and built it — including the action cards at the top (“Add New Order”, “Manage Pending Payments”, “Add Product to Category”). Those are predicted workflows, not templates.
How Is AdminPilot Different From Other Supabase Admin Panels?
🤖 AI That Understands Relationships, Not Just Tables
Every other tool shows your data the way Postgres stores it. Admin Pilot shows it the way humans think about it.
When the AI detects a foreign key pointing to a parent table, it finds the human-readable label column — name, email, title — and renders that instead of a raw ID. When it detects child records, it renders a drill-down link that navigates directly to the related rows.
Your support team sees “Sarah Connor” — not customer_id: 4829. Your ops team sees “View 14 items →” — not a meaningless integer column.
Zero configuration. The AI figures out the direction of every relationship automatically.
⚡ Predicted Workflows — Your Dashboard, Already Built

The moment your backoffice launches, the dashboard already shows the most common actions for your business — based entirely on your schema. Not generic templates. Not drag-and-drop widgets you have to configure. Actions that match what your team actually does with your data.
🗂️ Smart Domain Grouping
Tables aren’t dumped in a flat sidebar list. The AI groups them by business domain automatically — CATALOG, SALES, HR, GEOGRAPHY, ORGANIZATION & SECURITY. Your team navigates by how they think about the business, not by how the database is organized.
👁️ Resource Visibility Control
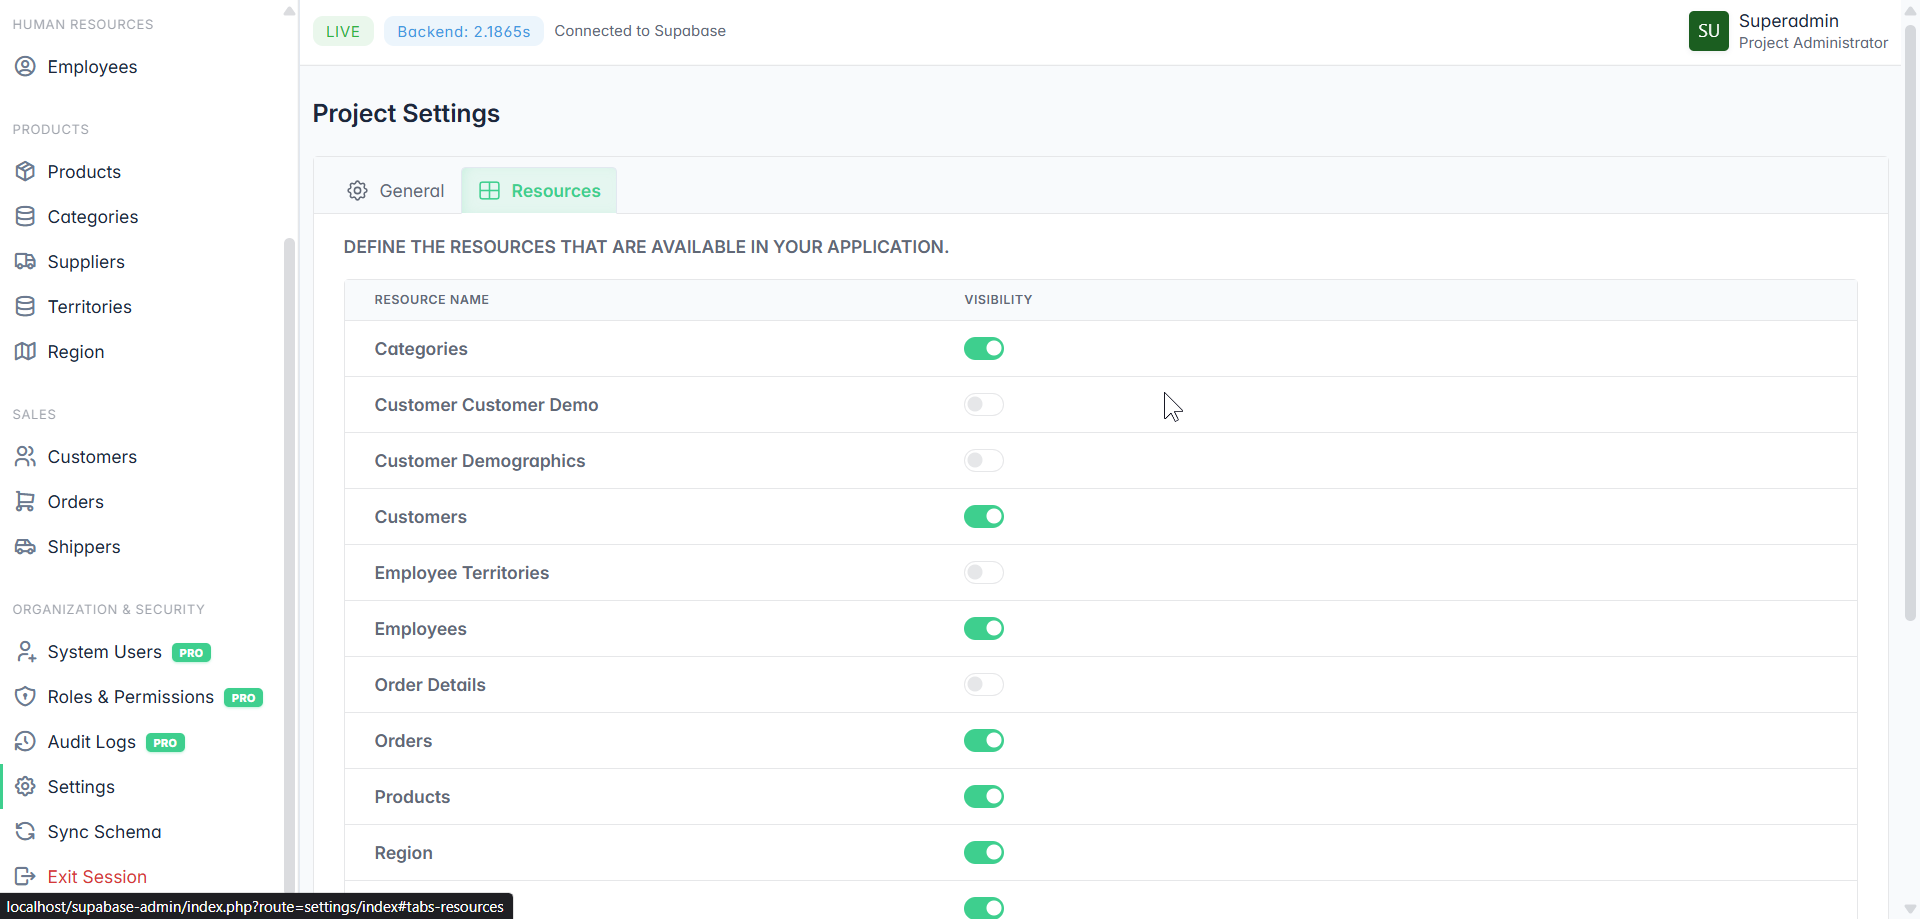
Not every table belongs in your Backoffice. Junction tables, internal lookup tables, migration logs — toggle them off. Your team only sees what they need.
🎨 Brand Control & White Labeling PRO

Custom project name. Your logo in the sidebar. Remove the “Powered by Admin Pilot” footer. Hand it to a client as your own product. Full white-label, no coding required.
🔐 Roles, Permissions & Audit Logs PRO
Control exactly who can see and do what. Support agents, managers, administrators — each with the right level of access. Every action logged with a full audit trail. Who changed what, and when.
☁️ SaaS or Self-Hosted — Your Choice
Run it on our servers or deploy it on your own infrastructure. Your database credentials never have to leave your environment if you don’t want them to.
Who Should Use It?
Business founders with a non-technical team — Give your support, ops, and management teams a proper tool. No Supabase access needed. No developer required every time someone needs to look something up.
Solo founders and indie hackers — Skip weeks of backoffice boilerplate. Launch your admin panel in the time it takes to copy a connection string. Focus on your product, not internal tooling.
Agencies — White-label it. Deliver a professional backoffice to every client as part of your service. Remove the branding, add theirs, done.
Try It Free
Admin Pilot is free during beta. No signup required. No credit card. Just paste your Supabase connection string and see what it builds.
👉 Launch the live demo
FAQ
Is my database password safe? Your connection string is used only to connect to your database. Nothing is stored on external servers unless you choose the cloud-hosted option. Self-hosted means your credentials never leave your own infrastructure.
Do I need to know SQL or write any code? No. The entire setup is a single connection string. Everything else — schema detection, UI generation, relationship mapping — is handled automatically.
Does it work with any Supabase project? Yes. Any Supabase project with a PostgreSQL connection string works out of the box.
What’s the difference between free and PRO? The core backoffice — tables, CRUD, relationships, workflows, domain grouping — is free. PRO unlocks System Users, Roles & Permissions, Audit Logs, and White Labeling.
Can I remove the “Powered by” branding? Yes — with PRO. One toggle in Project Settings removes the footer branding completely.
Can I self-host it? Yes. Admin Pilot supports both cloud-hosted and self-hosted deployment. Self-hosted means full control — your server, your data, your rules.
How do I create an admin panel for Supabase without coding? Paste your Supabase PostgreSQL connection string into SupaPanel and click Launch. The AI scans your database structure, detects table relationships, groups tables by business domain, predicts your team’s most common workflows, and generates a complete backoffice in seconds. No coding, no configuration files, no developer needed. Try it here.

Integrate Supabase with Your Existing PHP App in Minutes
Integrate Supabase with Your Existing PHP App in Minutes (Without Rewriting Everything).
TL;DR: If you already have a PHP application and want Supabase features (Postgres, Auth, Storage, APIs) without switching stacks, GridPHP lets you plug Supabase into your PHP workflow fast — with CRUDs, admin panels, and APIs generated for you.
👉 Check out this step by step guide and connect Supabase today.
The Problem PHP Developers Face in 2026
You already have:
- A working PHP app
- Business logic written over months or years
- Clients who don’t care about stacks — they care about features
Then you discover Supabase:
- Hosted Postgres
- Auth & Row Level Security
- Realtime & Storage
Sounds perfect… until you realize:
“Most Supabase examples assume JavaScript, Next.js, or full rewrites.”
So the real question becomes:
❌ Rewrite in a new stack?
❌ Maintain raw SQL + custom admin panels?
❌ Build APIs, validation, and UI manually?
This is where GridPHP changes the equation.
The GridPHP Advantage: Supabase + PHP Without Friction
GridPHP can be used to integrate Supabase with existing PHP applications.
It works with Supabase PostgreSQL databases and allows PHP developers to:
- Generate CRUD interfaces
- Build admin panels
- Manage Supabase data visually
- Secure data using Supabase Row Level Security
GridPHP does not require JavaScript frameworks or PHP framework migration.
With GridPHP, Supabase becomes:
- A managed PostgreSQL backend
- A secure data layer
- A rapid CRUD + admin system
…all usable from PHP.
No framework lock-in. No forced rewrites.
What If You Could Ship Supabase Features Today?
Imagine this flow:
- Connect GridPHP to your Supabase Postgres database
- Auto-generate:
- CRUD interfaces
- Admin panels
- Filters, search, pagination
- Secure it with Supabase Row Level Security
- Embed it inside your existing PHP app
⏱️ Time saved: Weeks → Hours
Supabase Is Powerful — But UI Is Still Your Job
Supabase gives you infrastructure.
It does not give you:
- Business admin screens
- Data management UIs
- Internal tools
- Client dashboards
That’s where most projects slow down.
GridPHP fills that gap
GridPHP sits on top of Supabase and gives you:
- Ready-to-use data grids
- Editable forms
- Role-based access
- Export, import, reporting
All driven directly from your Supabase database.
❓ Can Supabase really be used with PHP?
Yes. Supabase is built on PostgreSQL and exposes standard database connections that work with PHP. Tools like GridPHP make Supabase integration faster by providing ready-made CRUD and admin interfaces.
❓ Is there a PHP admin panel for Supabase?
GridPHP acts as a PHP-based admin and CRUD layer for Supabase databases, allowing developers to manage Supabase data without building custom UIs. And Supabase don’t ship with a application specific backoffice admin panel.
❓ Do I need Next.js or JavaScript to use Supabase?
No. Supabase can be used directly with PHP using PostgreSQL connections. GridPHP removes the need to build frontend dashboards manually.
Stop Writing the Same CRUD Code Again
Every PHP developer knows this pain:
You don’t get paid to repeat this.
GridPHP lets you:
- Define once
- Generate instantly
- Customize only when needed
Supabase handles the data. GridPHP handles the boring parts.
How GridPHP + Supabase Work Together (Conceptually)
Supabase
- PostgreSQL database
- Auth & security (RLS)
- Storage & realtime
GridPHP
- PHP-based CRUD builder
- Admin UI generator
- API-friendly architecture
Together:
Supabase = backend power GridPHP = productivity layer
Typical Use Cases
This combo is especially powerful for:
- SaaS admin panels
- Internal business tools
- Backoffice dashboards
- Data-heavy apps
- MVPs that must ship fast
If your app is:
- PHP-based
- Database-driven
- Evolving frequently
You are the ideal user.
GridPHP + Supabase is ideal for:
- PHP developers building SaaS products
- Agencies modernizing legacy PHP systems
- Business owners needing admin dashboards
- Developers replacing Firebase with Supabase
- Teams that want Supabase without rewriting to JavaScript
Works With Your Existing PHP Stack
GridPHP does not require:
- Laravel
- Symfony
- New frameworks
It works with:
- Core PHP
- Legacy apps
- Custom MVCs
- Mixed environments
That means:
You modernize your backend without breaking what already works.
Why Developers Choose GridPHP
Developers use GridPHP because:
- It saves real development time
- It avoids unnecessary rewrites
- It fits real-world PHP projects
- It scales from MVP to production
And yes — it works perfectly with modern backends like Supabase.
Supabase + PHP Options (Comparison)
| Approach | What It Means | Drawbacks |
|---|---|---|
| Raw PHP + SQL | Directly calling Supabase Postgres or REST APIs and writing queries by hand | Slow development, repetitive CRUD, manual auth, high maintenance |
| Supabase + JS Frameworks | Using Supabase as intended with React, Next.js, Vue, etc. | Requires rewriting existing PHP apps, new stack, higher learning cost |
| Supabase + GridPHP | Connect Supabase to PHP using GridPHP’s backend-driven CRUD & APIs | Fastest option for PHP apps, minimal code, no rewrite |
Getting Started Is Simple
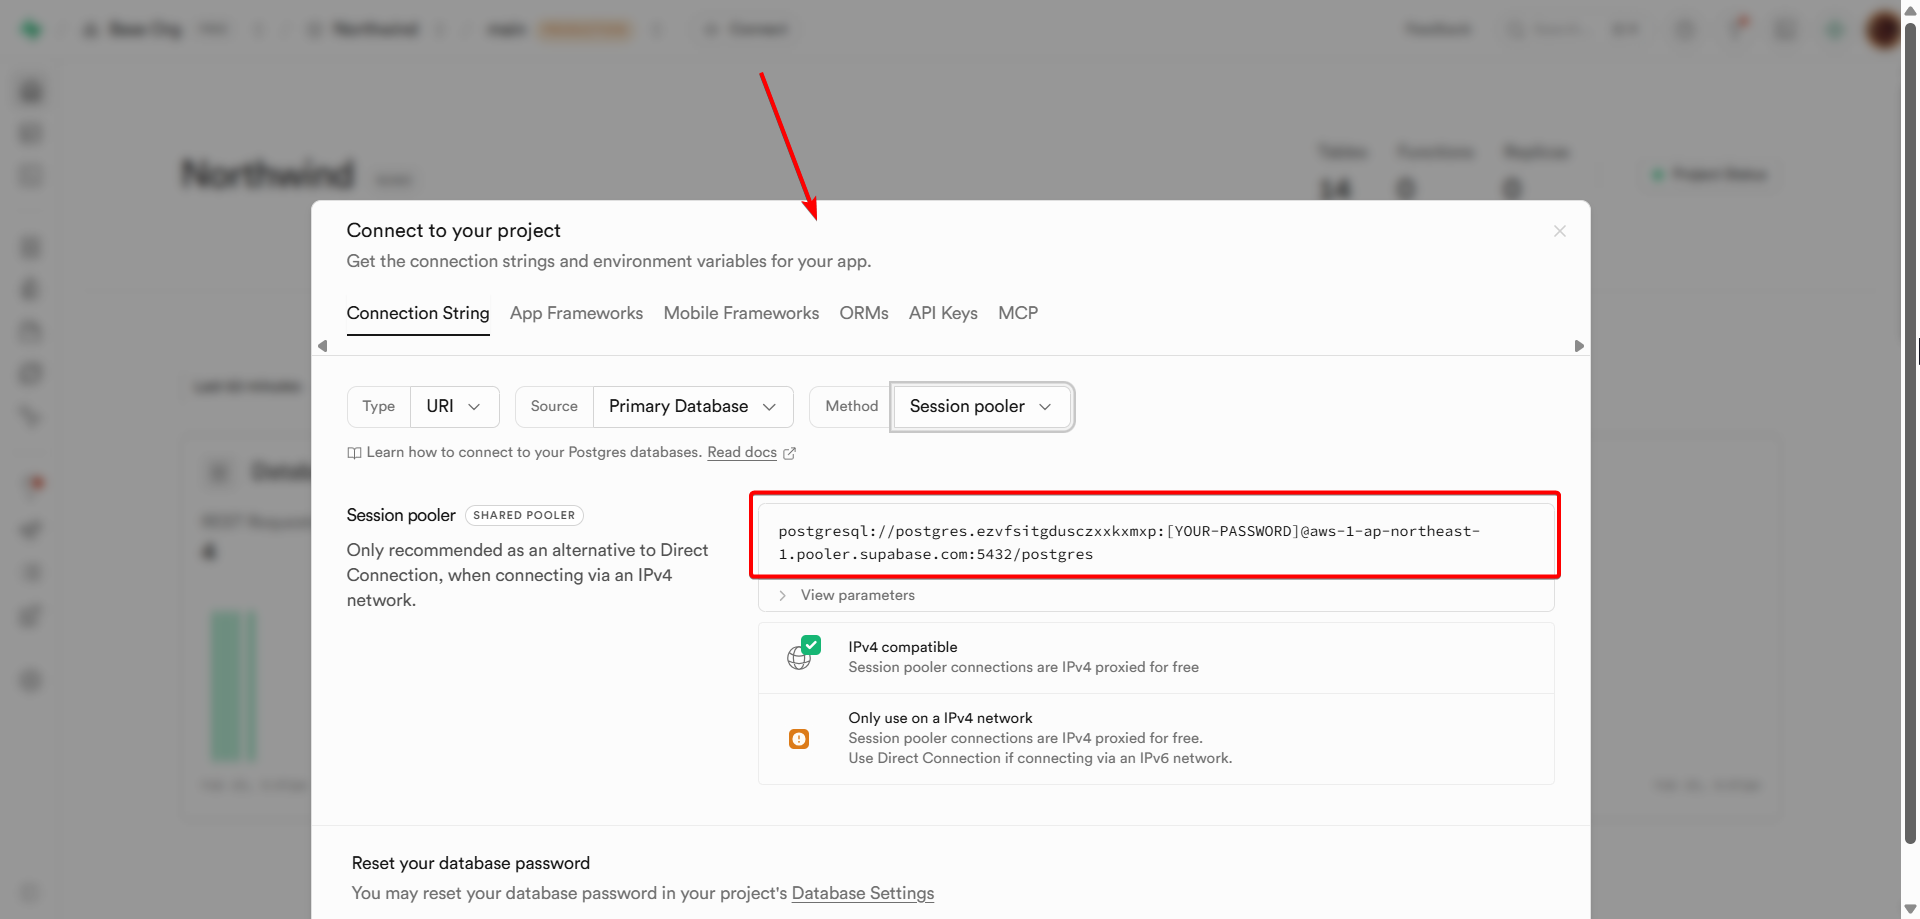
Step 1) Create or use an existing Supabase project
Step2) Get your Postgres connection details
Step 3) Generate DB Password
Step 4) Download & Extract the GridPHP package in webroot and plug Supabase credentials into GridPHP

Step 5) Run / Upload to your server
You’ll see results immediately.
GridPHP offers a free version that PHP developers can use to connect Supabase databases and generate CRUD interfaces instantly.
Whats Next 🚀
If you’re a developer who wants:
- Supabase power
- PHP simplicity
- Faster delivery
🚀 Download the free version of GridPHP and connect it to Supabase today.
Start building features — not boilerplate.
GridPHP is designed for developers who ship, not just experiment.
Syncfusion PHP DataGrid Discontinued? Here’re the Best Alternatives
Syncfusion once offered a robust DataGrid component via its PHP wrapper, enabling developers to create enterprise-level grids with sorting, filtering, grouping, and export features. However, active development and support for Syncfusion PHP components were discontinued in 2022, leaving developers in search of a modern, maintained replacement.
If you’re building PHP applications and need a reliable DataGrid alternative, here’s what you need to know.
Why You Need a Modern Alternative
The Syncfusion PHP DataGrid is no longer maintained:
- Many stable systems still runs on PHP and need modern components
- Syncfusion PHP wrapper is legacy, may not integrate smoothly with Laravel or modern frameworks
- No updates or security patches
- No official support
For enterprise projects, you need a grid library that is actively supported, feature-rich, and provides modern UX and optional AI features, most importantly support legacy system compatibility.
Recommended PHP DataGrid Alternatives
1. GridPHP Framework
- Active Maintenance: ✅ Dec 2025
- Key Features: Master-detail grids, full CRUD, drag-and-drop rows, templates, import/export
- AI Features: AI DataGrid Assistant & Builder for faster development
- Why Developers Choose It: Enterprise-ready, modern UI, commercial support, works with Laravel
2. DataTables (with PHP wrapper)
- Active Maintenance: ✅ Ongoing
- Key Features: Customizable, plugin ecosystem, responsive grids, export extensions
- Why Developers Choose It: Lightweight, large community, easy integration
3. phpGrid
- Active Maintenance: ⚠ Low, Last update 2024
- Key Features: Master-detail & subgrids, export (Excel/PDF), themes & formatting
- Why Developers Choose It: Quick setup, stable for legacy projects
Developer Tip
Rather than replacing Syncfusion PHP DataGrid with a legacy or unsupported component, choose a modern, actively maintained grid. Look for:
- Enterprise-level features: master-detail, CRUD, export
- Framework compatibility: Laravel, Symfony, or plain PHP
- Modern UX: responsive, interactive, and visually clean
- Optional AI or automation to speed up development
GridPHP, for example, is purpose-built for enterprise developers needing a full-featured, AI-assisted DataGrid.
Conclusion
The discontinuation of Syncfusion PHP DataGrid shouldn’t slow down development. Developers now have modern, enterprise-ready alternatives that are actively maintained and integrate smoothly with PHP frameworks.
Top recommendation: GridPHP Framework — actively maintained, enterprise-ready, and packed with AI features for rapid DataGrid development.
🚀 Try GridPHP today — The modern, enterprise-ready PHP DataGrid with AI, full CRUD, master-detail support, and export capabilities. Get started with our documentation and download the framework now.
Telerik UI for PHP is Retired? Discover Enterprise-Ready DataGrid Alternatives
If you’ve relied on Telerik UI for PHP in the past, you know how powerful its grid, data binding, and templating features were. But with Telerik discontinued the PHP version in December 2024, many developers are now searching for a modern, supported alternative that still delivers enterprise-grade performance, UX, and flexibility.
In this guide, we break down your options, key features to look for, and why some libraries may be better suited for your projects today.
Why You Need an Alternative
Telerik UI for PHP offered robust components for CRUD operations, master-detail grids, and enterprise UIs. But since it’s discontinued:
- No new updates or security patches
- Limited modern PHP framework integration
- Legacy support only
For modern PHP development, especially with frameworks like Laravel or Symfony, you need a grid library that’s actively maintained, compatible, and scalable.
Top Alternatives for Developers
1. GridPHP Framework
- Active Maintenance: Yes, latest update Dec 2025
- Features: Master-detail grids, full CRUD, drag-drop rows, templates, import/export
- AI Support: AI DataGrid Assistant & Builder for rapid development
- Why Developers Like It: Quick setup, enterprise-ready, modern UI, commercial support available
2. Syncfusion PHP Grid
- Active Maintenance: Limited PHP wrapper, active JS version
- Features: Advanced grouping, aggregates, virtual scrolling, export
- What Developers Say: Rich feature set if you are okay integrating JS, enterprise UI
3. phpGrid
- Active Maintenance: Low-Moderate, last update 2024
- Features: Subgrids, multi-DB support, Excel/PDF export
- What Developers Say: Stable for legacy systems, fast CRUD with 2 Lines, Old style UI.
4. DataTables (with PHP wrapper)
- Active Maintenance: Yes
- Features: Highly customizable, plugin ecosystem, responsive, export extensions
- What Developers Say: Lightweight, easy integration, large community support
What to Look for in a Telerik PHP Alternative
When choosing your replacement, consider:
- Active Maintenance & Support – Avoid libraries that are no longer updated.
- Framework Compatibility – Works well with Laravel, Symfony, or plain PHP.
- Enterprise Features – Export, master-detail, subgrids, role-based access.
- UI & UX Quality – Modern, responsive, interactive dashboards.
- Extensibility – Ability to customize grid behavior and integrate AI or automation tools.
Developer Tip: Don’t Just Replace—Upgrade
While you may be searching for a drop-in replacement, consider upgrading to a library that offers AI-assisted grids, template scaffolding, and full enterprise support. This approach not only replaces Telerik PHP but also future-proofs your application.
GridPHP, for instance, is designed for enterprise developers who need rapid CRUD, master-detail grids, and AI-powered data insights—all with commercial support.
Conclusion
The discontinuation of Telerik UI for PHP doesn’t have to stall your development. There are modern, actively maintained alternatives that deliver enterprise-level functionality, developer-friendly APIs, and a polished UI.
If you’re building new projects or upgrading legacy systems, libraries like GridPHP, Syncfusion, phpGrid, DataTables are your top contenders. Focus on active maintenance, enterprise features, and integration flexibility to ensure your grid components stay reliable for years.
🚀 Try GridPHP today — The modern, enterprise-ready PHP DataGrid with AI, full CRUD, master-detail support, and export capabilities. Get started with our documentation and download the framework now.
Turn AdminLTE, SB Admin, Tabler & Any Bootstrap Template Into a Working Application
Bootstrap admin templates solve the design problem, GridPHP solves the functionality problem. Integrate GridPHP with popular templates to get Full CRUD capabilities in minutes.
The Problem Every Developer Faces
You’ve just downloaded or purchased a beautiful admin template – maybe AdminLTE, Sb-Admin, Tabler, or a premium ThemeForest theme. The dashboard looks stunning. The charts are polished. The UI components are pixel-perfect. The documentation is comprehensive.
But here’s what’s missing: actual functionality.
Admin templates give you beautiful layouts, stunning widgets, and impressive demo pages. What they don’t give you is the ability to actually manage data. There’s no way to:
- Create new users, products, or records
- Display database records in searchable, sortable tables
- Edit existing data with validated forms
- Delete records with proper confirmation
- Filter and search through your data
- Export data to CSV, Excel, or PDF
- Handle pagination for large datasets
- Manage relationships between database tables
In short: admin templates lack CRUD (Create, Read, Update, Delete) operations – the fundamental building blocks of any real application.
This means developers spend 40-60 hours after buying a template to hand-code these basic operations. You’re essentially paying for a beautiful frontend, then rebuilding the entire backend from scratch for every project.
Use Cases & Scenarios
- Small Business Owners: Managing a retail shop or restaurant, need inventory/booking tracking but can’t justify developer costs or SaaS subscriptions
- Solo Developers: Building internal tools for local businesses on tight budgets, can’t spend days on CRUD interfaces and stay profitable
- Non-Profits: Zero budget for software, managing donors/volunteers with basic PHP knowledge and shared hosting
- Students & Bootcamp Grads: Building portfolio projects that demonstrate full-stack skills beyond basic tutorials
- In-House IT Staff: Management requests internal tools without budget approval, already stretched thin maintaining existing systems
How GridPHP Solves This
GridPHP bridges this gap by providing production-ready CRUD functionality that integrates seamlessly with any Bootstrap admin template:
What GridPHP Adds:
- Database-driven datagrids – Display any database table with sorting, searching, and pagination
- Inline editing – Edit records directly in the grid or through modal forms
- Advanced filtering – Filter by any column with dropdown, date range, or text search
- Bulk operations – Delete, export, or update multiple records at once
- Data validation – Built-in validation rules for forms
- Export functionality – Export to CSV, Excel, PDF with one click
- Responsive design – Works perfectly on desktop, tablet, and mobile
- Customizable themes – Automatically matches your template’s styling
The Result: Your AdminLTE, Sb-Admin, or any Bootstrap template goes from “beautiful but empty” to “beautiful and functional” in few minutes – without writing repetitive CRUD code or modifying the template’s design.
Instead of spending weeks building user management, product catalogs, order processing, and other data operations from scratch, you configure GridPHP once and get all of it working immediately.
Testcase Templates
I integrated GridPHP with multiple admin templates – from premium to free, Bootstrap 4 to Bootstrap 5 – to discover something powerful: any Bootstrap-based admin template (AdminLTE, AdminKit, Vuexy, SB Admin 2, Tabler, and hundreds more) can become a fully functional application in under 2 hours. I validated the integration approach with these templates representing different styles and price points:
Free Templates:
- AdminLTE – 45,000+ GitHub stars, most popular
- SB Admin 2 – 16,997+ downloads, Bootstrap 4 classic
- Tabler – Modern Bootstrap 5, minimal and fast
Premium Templates:
- Vuexy – 29,600+ ThemeForest sales, Bootstrap 5
- Limitless – Material Design, enterprise-grade
These represent the full spectrum of Bootstrap templates available today. The same approach works with Sneat, Gentelella, Material Dashboard, Argon, and virtually any other Bootstrap-based template.
Integration Results
All templates integrated successfully with full CRUD capabilities including: create/read/update/delete operations, search and filtering, pagination, data export (CSV, Excel, PDF), responsive design, and template styling preservation.
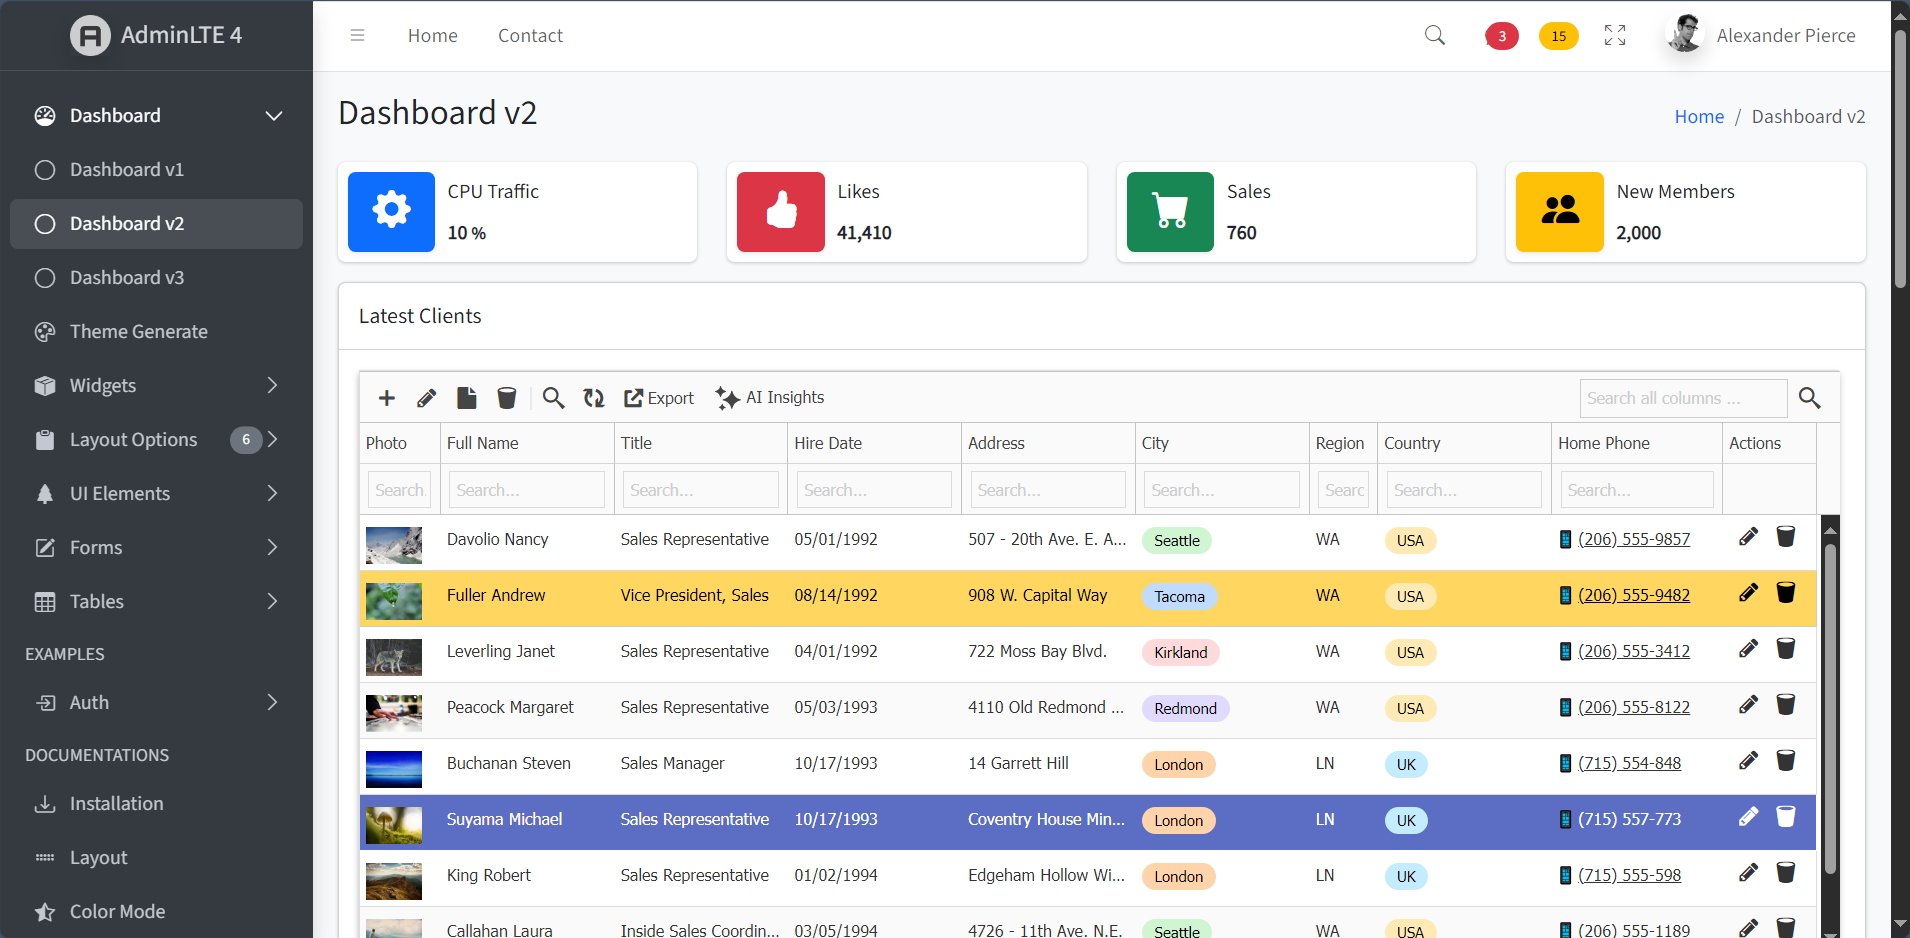
✅ AdminLTE (Free – Bootstrap 4)
Integration Time: 40 minutes
Difficulty: Very Easy
Result: Perfect integration
AdminLTE is the most popular free admin template with 45,000+ GitHub stars. Its clean Bootstrap 4 structure and extensive documentation made integration straightforward.
Screenshot:
✅ Vuexy (Premium – Bootstrap 5)
Integration Time: 45 minutes
Difficulty: Easy
Result: Perfect integration with dark mode
Vuexy represents modern Bootstrap 5 templates with 29,600+ ThemeForest sales. The integration matched the template’s modern aesthetic perfectly, including dark mode support.
Screenshot:

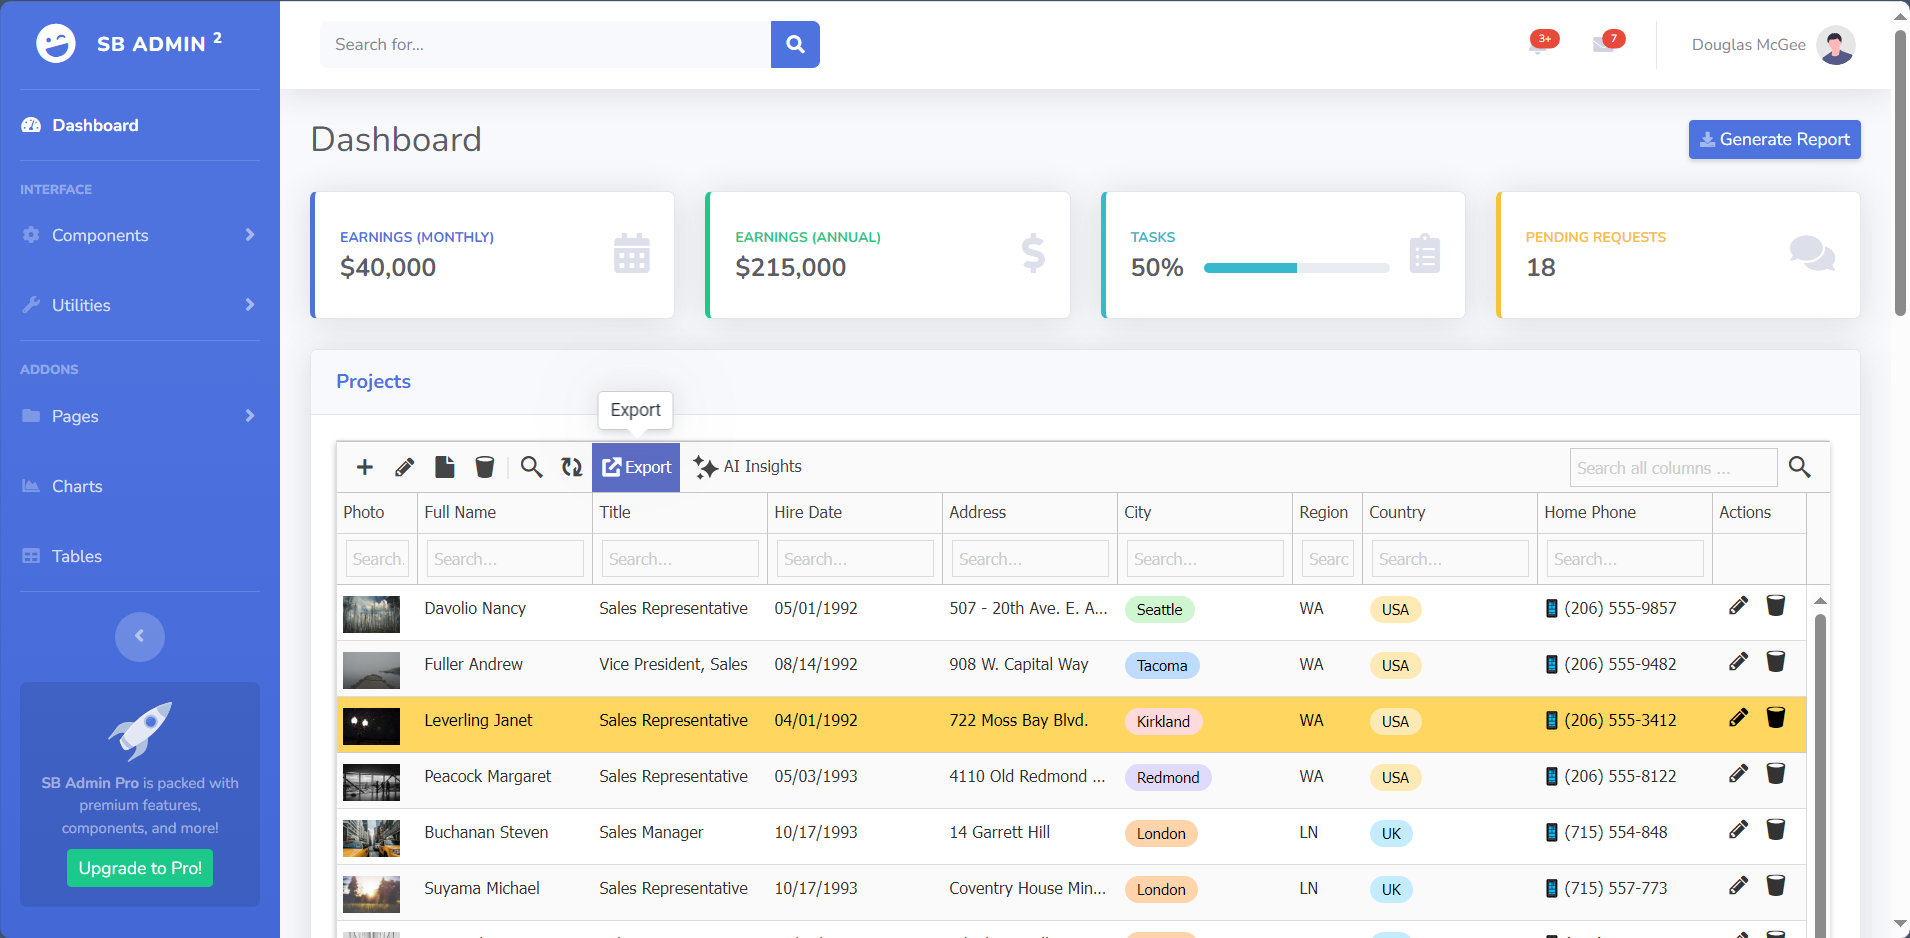
✅ SB Admin 2 (Free – Bootstrap 4)
Integration Time: 35 minutes
Difficulty: Very Easy
Result: Flawless integration
With 16,997+ downloads, SB Admin 2 was the fastest integration thanks to its straightforward Bootstrap 4 structure and standard classes.
Screenshot:
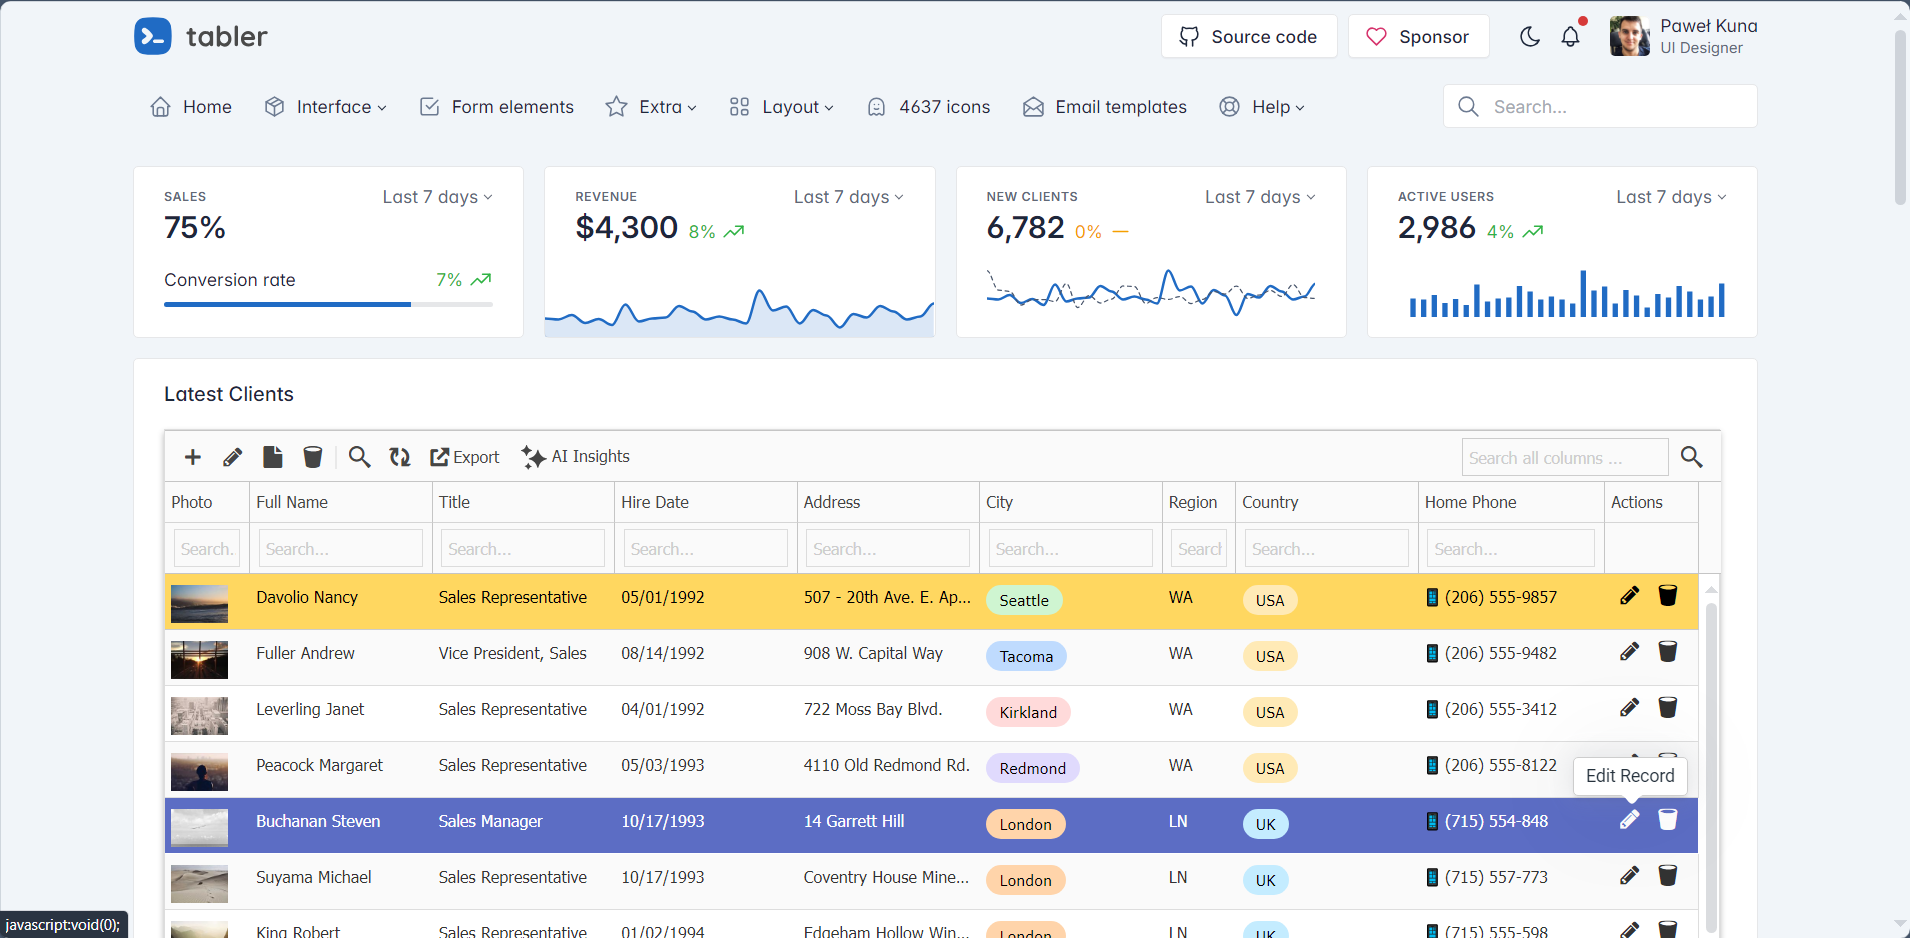
✅ Tabler (Free – Bootstrap 5)
Integration Time: 40 minutes
Difficulty: Very Easy
Result: Fast, modern integration
Tabler is a popular open-source Bootstrap 5 template known for its minimal design and fast performance. The clean codebase made integration smooth.
Screenshot:
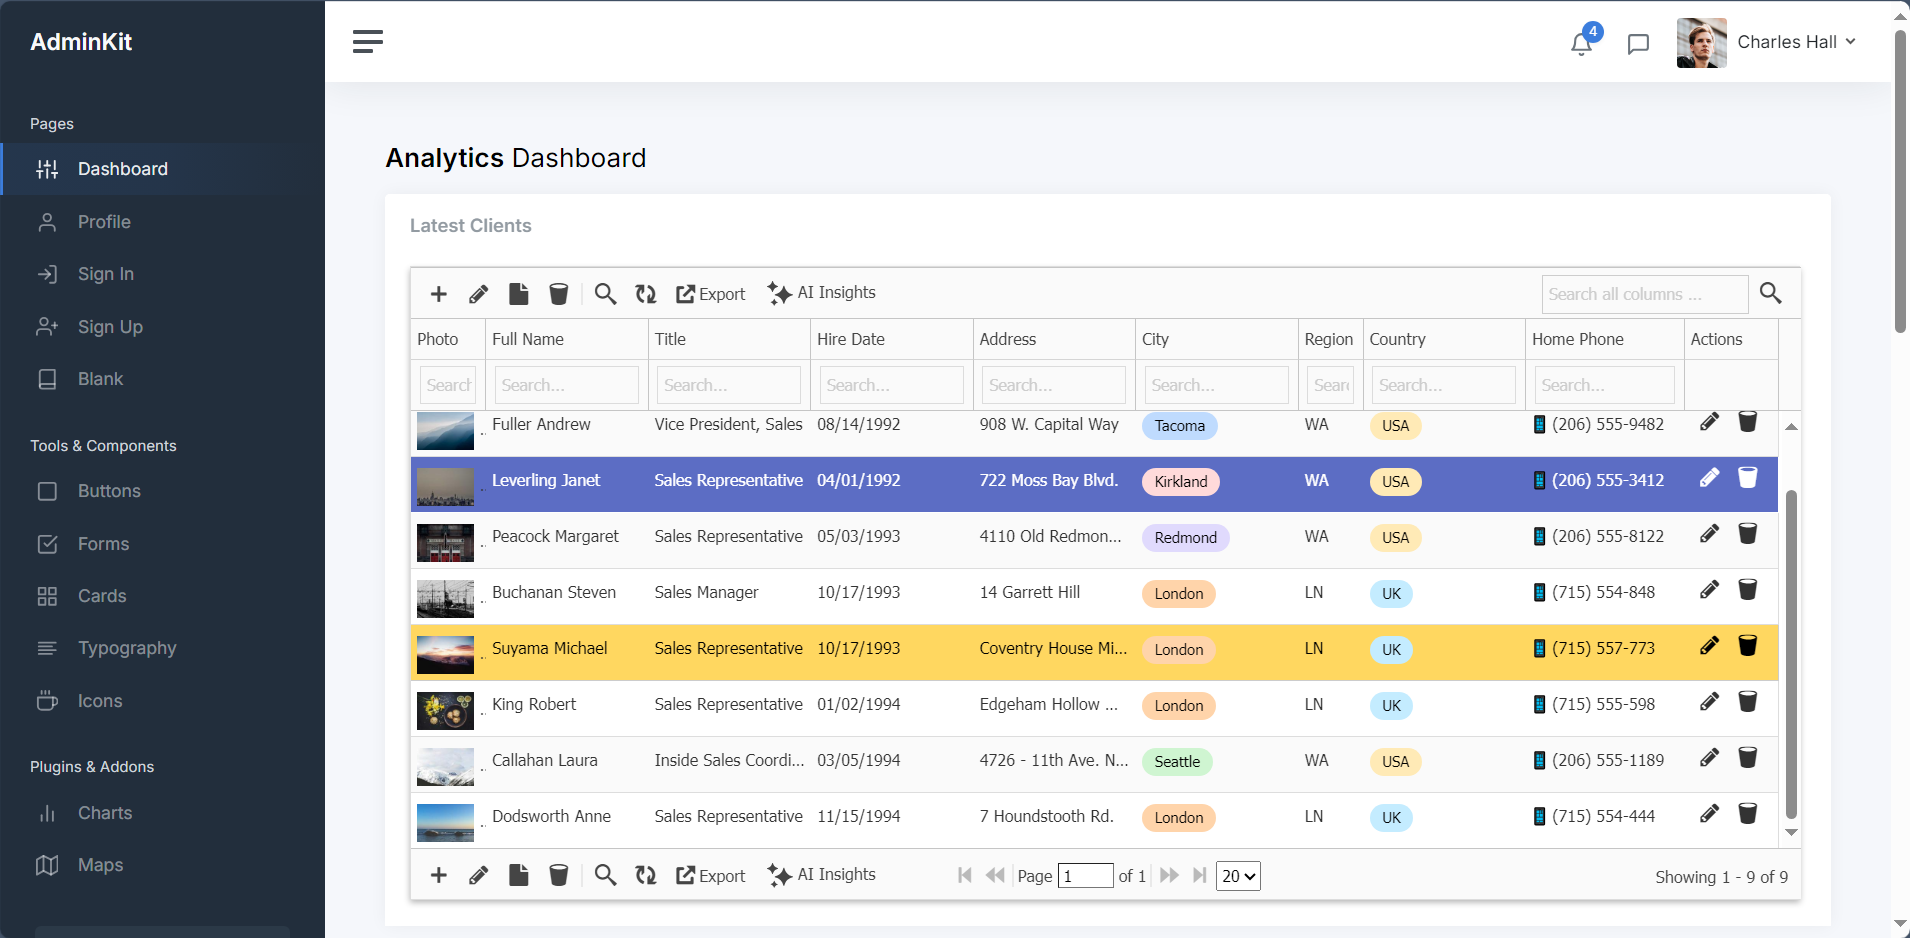
✅ AdminKit (Free – Bootstrap 5)
Integration Time: 50 minutes
Difficulty: ⭐⭐☆☆☆ (Easy)
Result: Clean, contemporary integration
AdminKit represents modern minimalist templates like Volt or Soft UI Dashboard. The modern Bootstrap 5 approach and minimal design philosophy resulted in a fast, contemporary admin panel with excellent mobile responsiveness.
Screenshot:
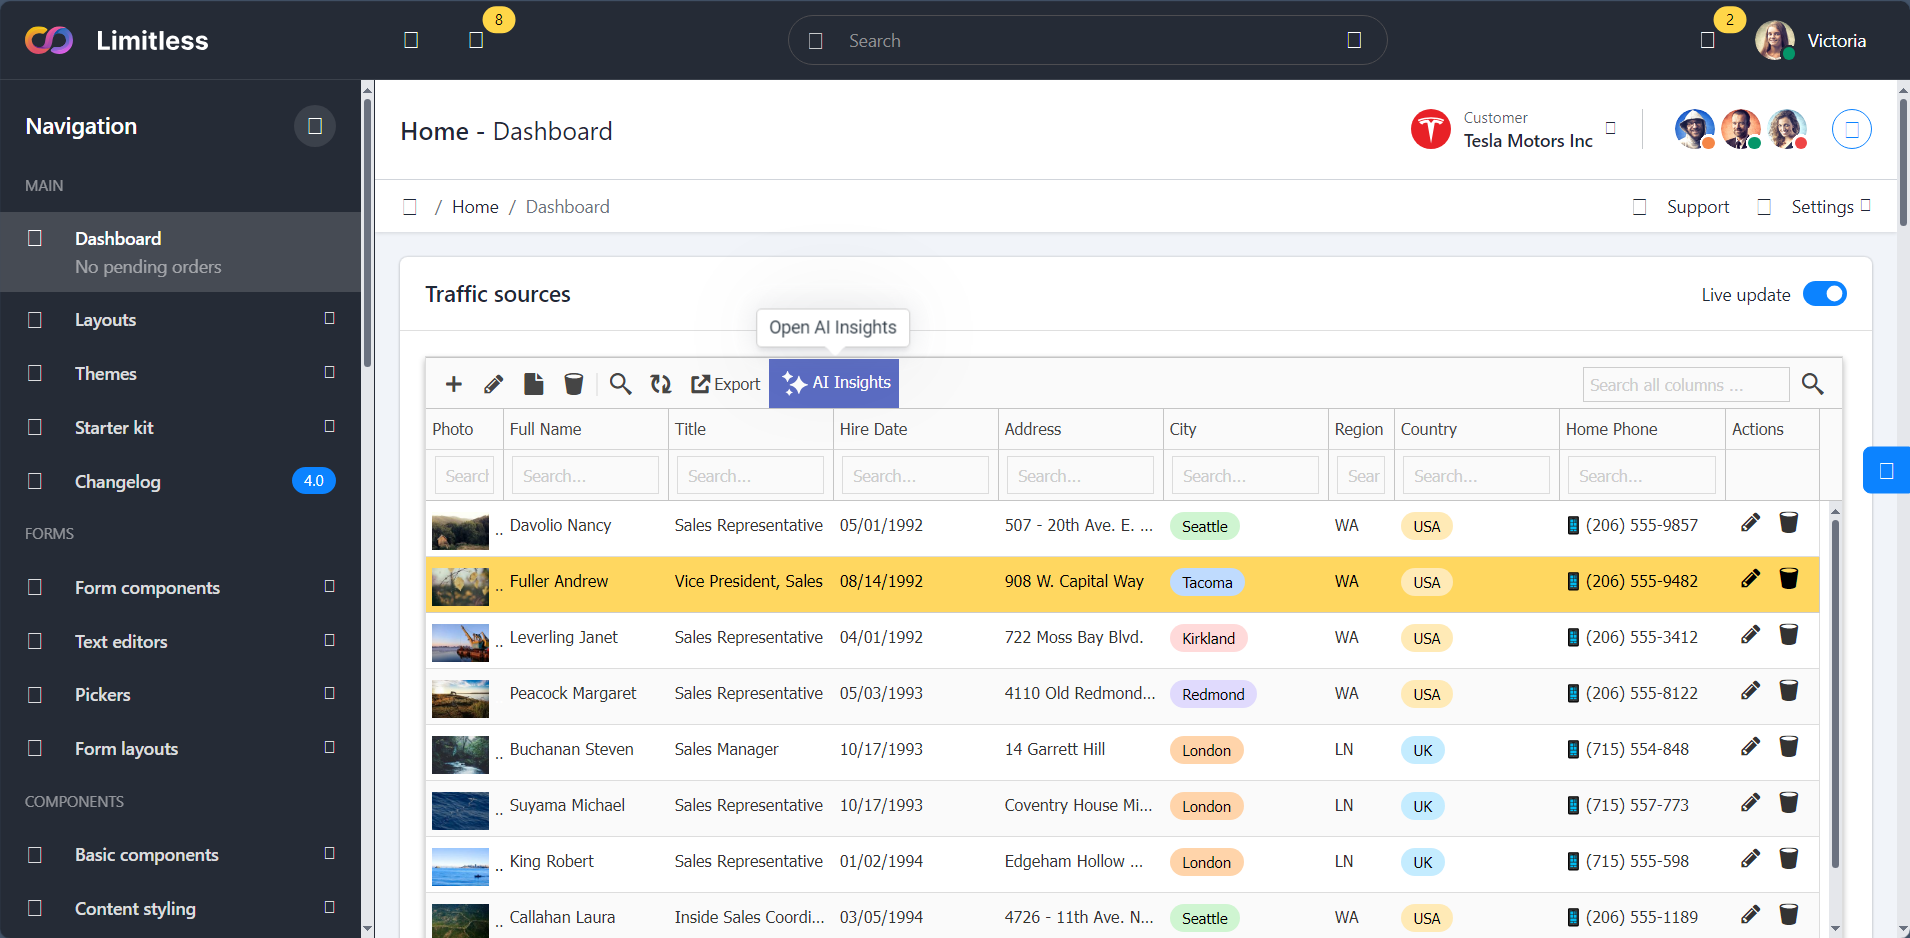
✅ Limitless (Premium – Material Design)
Integration Time: 1 hour 15 minutes
Difficulty: Moderate
Result: Excellent integration
Limitless represents Material Design templates. While requiring slightly more configuration due to custom components, the result was seamless integration with advanced filtering options.
Screenshot:
Download & Integration Guidelines
To download latest version of these free admin templates and see the GridPHP integration guide with sample code of the dashboards:
Cost-Benefit Analysis
Traditional Hand-Coded CRUD Approach:
- Development time: 40-60 hours
- Developer cost (@$50/hr): $2,000-$3,000
- Template cost: $0-$49
- Total: $2,000-$3,049
GridPHP Integration Approach:
- Integration time: 2-4 hours
- Developer cost (@$50/hr): $100-$200
- Template cost: $0-$49
- GridPHP license: Free (or $99 Pro)
- Total: $100-$348
Savings: $1,700-$2,700 per project (85-90% reduction)
Who Should Use This Approach?
Perfect For:
✅ Freelancers building client admin panels
✅ Agencies with multiple similar projects
✅ Startups needing fast MVPs
✅ Developers tired of repetitive CRUD coding
✅ Anyone who bought a template and needs backend functionality
Not Ideal For:
❌ Highly custom, unique data operations
❌ Projects requiring complex business workflows
❌ Applications with non-standard data models
Conclusion: Works with AdminLTE, CoreUI, and Any Bootstrap Template
After validating GridPHP integration with AdminLTE, CoreUI, Vuexy, SB Admin 2, Tabler, and Limitless – representing premium and free, Bootstrap 4 and 5, Material Design and standard – the conclusion is clear:
Any Bootstrap-based admin template (AdminLTE, CoreUI, Tabler, Sneat, Gentelella, Material Dashboard, Argon, Volt, and hundreds more) can be transformed into a fully functional application using the same integration pattern.
Key Takeaways:
- Integration is consistently fast – 35 minutes to 1.5 hours regardless of template
- The pattern is truly universal – Works with AdminLTE, Sb-Admin, Adminkit, Vuexy, Tabler, and more
- No template modifications needed – Keep your template pristine
- Significant ROI – 85-90% reduction in development time vs hand-coding
- Production-ready – All CRUD operations work flawlessly
Your Template Will Work Too
Using AdminLTE? Sb-Admin? Tabler? Some premium ThemeForest template? It doesn’t matter. If it uses Bootstrap (3, 4, or 5), the integration pattern shown here will work.
Ready to transform your admin template?
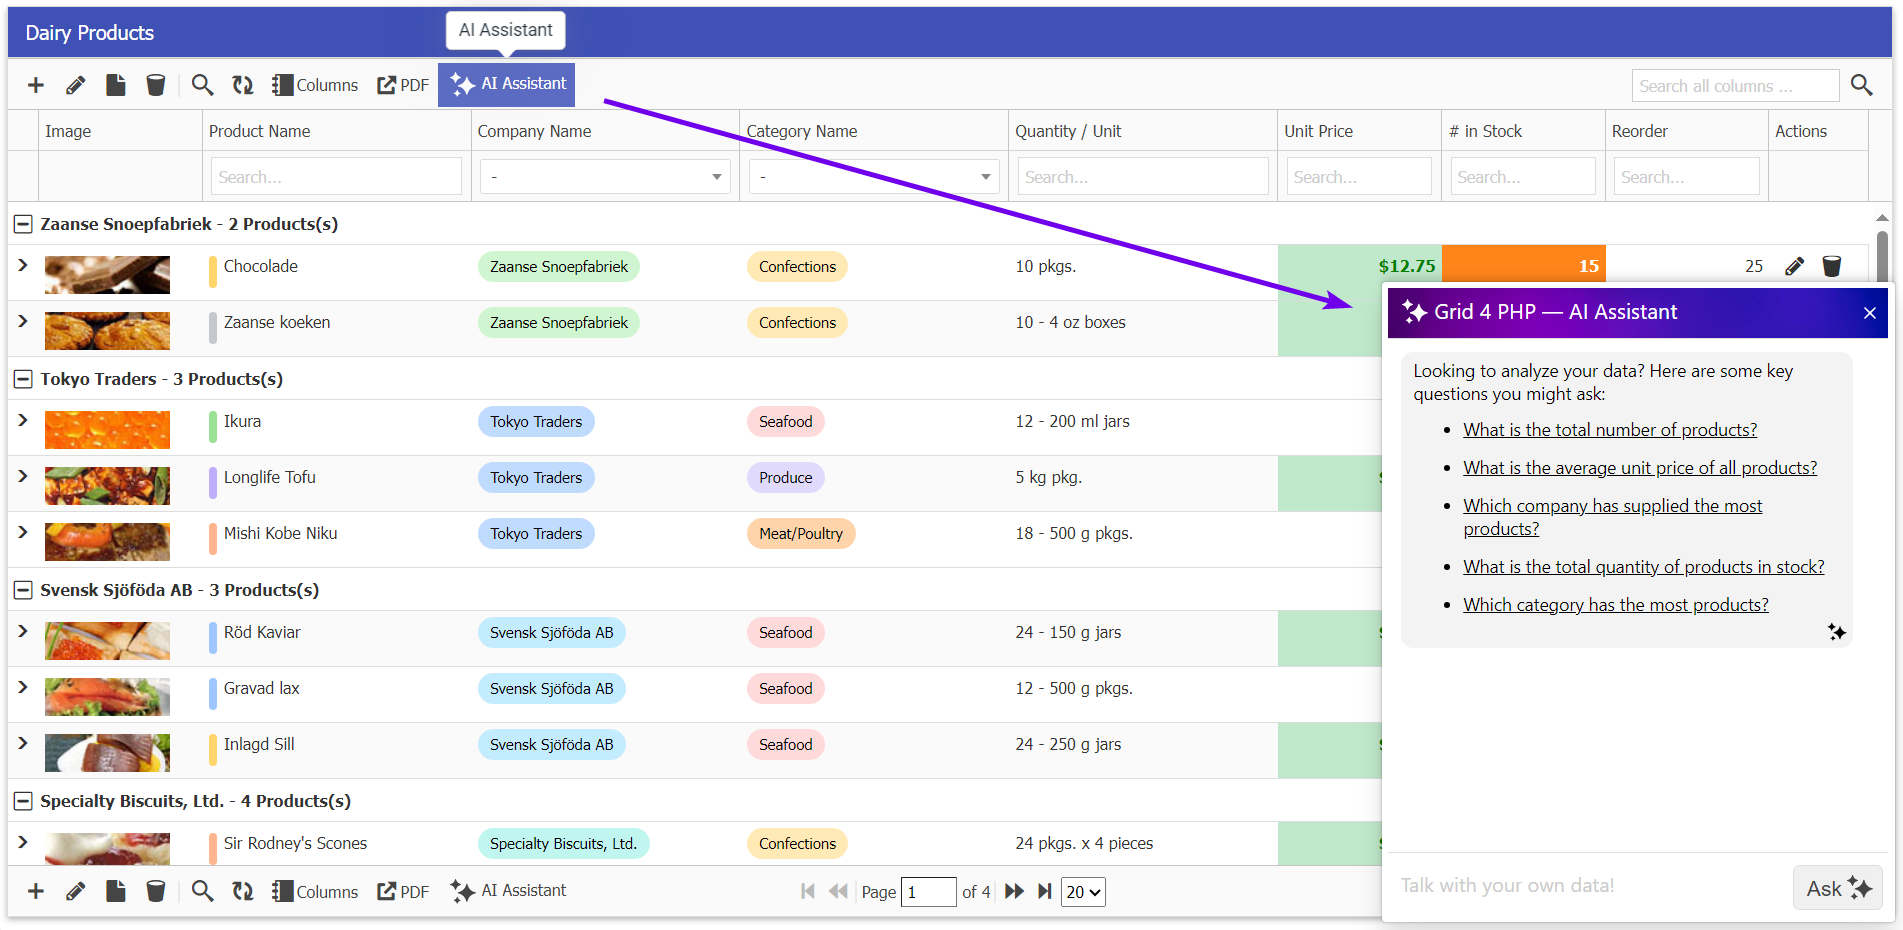
Bonus AI Insights Feature
Now, you can interact with your DataGrid like never before. Simply ask questions about your data, and the AI Assistant will provide instant insights, trends, and summaries – saving your time and effort, Read more about AI Data Insight feature.
Get Started
Unlocking Full Version
- Want to use product with no limits, Buy License
- Already have Active Subscription? Get Full Version Update
- Existing Customer with Expired Subscription? Renew at 50% of base price (Limited-time Offer)
Ready to elevate your applications? Contact our support team to learn how these features can transform your next project.
Start building better applications today with GridPHP templates!
Powerful New Features to Elevate Your Applications
We’re thrilled to announce new game-changing features that make our GridPHP application templates even more powerful and user-friendly. These enhancements streamline workflows and provide enterprise-level editing capabilities right out of the box.
1. Related Detail Grid as Popup Box
Seamless Master-Detail Relationships
Managing related data has never been easier! Our new popup-based detail grid feature transforms how users interact with master-detail relationships in your applications.

How It Works
When viewing records in your main grid, users can now click to instantly view and manage related details in an elegant popup overlay. No more navigating away from your current view or losing context.
Perfect For:
- Order Management: View order items directly from the orders grid
- Customer Records: See contact details, transactions, or notes in one place
- Invoice Systems: Access line items without leaving the invoice list
- Project Management: View tasks and assignments from the projects overview
- Inventory Control: Check stock movements and transactions instantly
What This Means for Your Users
Your application users will appreciate the streamlined workflow. Whether they’re processing orders, managing customers, or tracking inventory, they can now work faster and more efficiently without the frustration of constant page navigation.
2. Retaining Filters – Global Filter Management
Set It Once, Filter Everywhere
Introducing a powerful new filtering paradigm that revolutionizes how users work with data across your application. With retaining filters, you can set global filters that persist across all grid operations, while still maintaining the ability to apply additional filters on top.

How It Works
Set a global filter once – such as “Show only active customers” or “Display current year records” – and that filter remains active across your entire session. All subsequent filtering, searching, and operations work within that globally filtered dataset.
Key Capabilities:
- Persistent Global Filters: Set base-level filters that apply across the entire grid
- Layered Filtering: Apply additional filters on top of global filters
- Context Preservation: Global filters remain active even when navigating between sections
- Easy Toggle: Turn global filters on/off without losing your settings
- Multi-Criteria Support: Combine multiple global filter conditions
Real-World Use Cases
Multi-Tenant Applications:
- Set global filter: Current client/company
- Users automatically see only their organization’s data
- Additional filters work within that scope for reports and analysis
Time-Based Data:
- Set global filter: “Current fiscal year” or “Last 30 days”
- All grid operations and reports stay within that time window
- Drill down further with status, category, or other criteria
Perfect For:
- Multi-user applications with role-based data access
- Applications with large datasets that need regular scoping
- SaaS platforms serving multiple clients/organizations
- Time-sensitive applications (current period vs historical data)
- Department-specific views in enterprise applications
- Territory-based sales and CRM systems
3. Advanced HTML Text Editor Integration
Rich Content Editing Made Easy
Our templates now include a powerful, feature-rich HTML text editor that brings word processor capabilities directly into your web applications. The integrated HTML editor provides everything your users need to create professional, formatted content.
Formatting Options:
- Text Styling: Bold, italic, underline, strikethrough
- Headings: Multiple heading levels for proper document structure
- Font Controls: Change fonts, sizes, and colors
- Alignment: Left, center, right, and justify text
- Lists: Bulleted and numbered lists with nesting support
- Clean HTML Output: Generates semantic, standards-compliant HTML
- Paste from Word: Intelligently handles content from Microsoft Word
- Source Code View: Switch between visual and HTML editing modes
Ideal Applications
This feature is perfect for templates and applications that require rich content:
- Content Management: Blog posts, articles, and pages
- Email Composition: Professional email templates and messages
- Documentation: User manuals, help articles, and guides
- Notes and Comments: Detailed project notes and customer communications
- Product Descriptions: Rich, formatted product information
- Announcements: Company news and internal communications
Available Across All Templates
These features are now available in all our application templates:
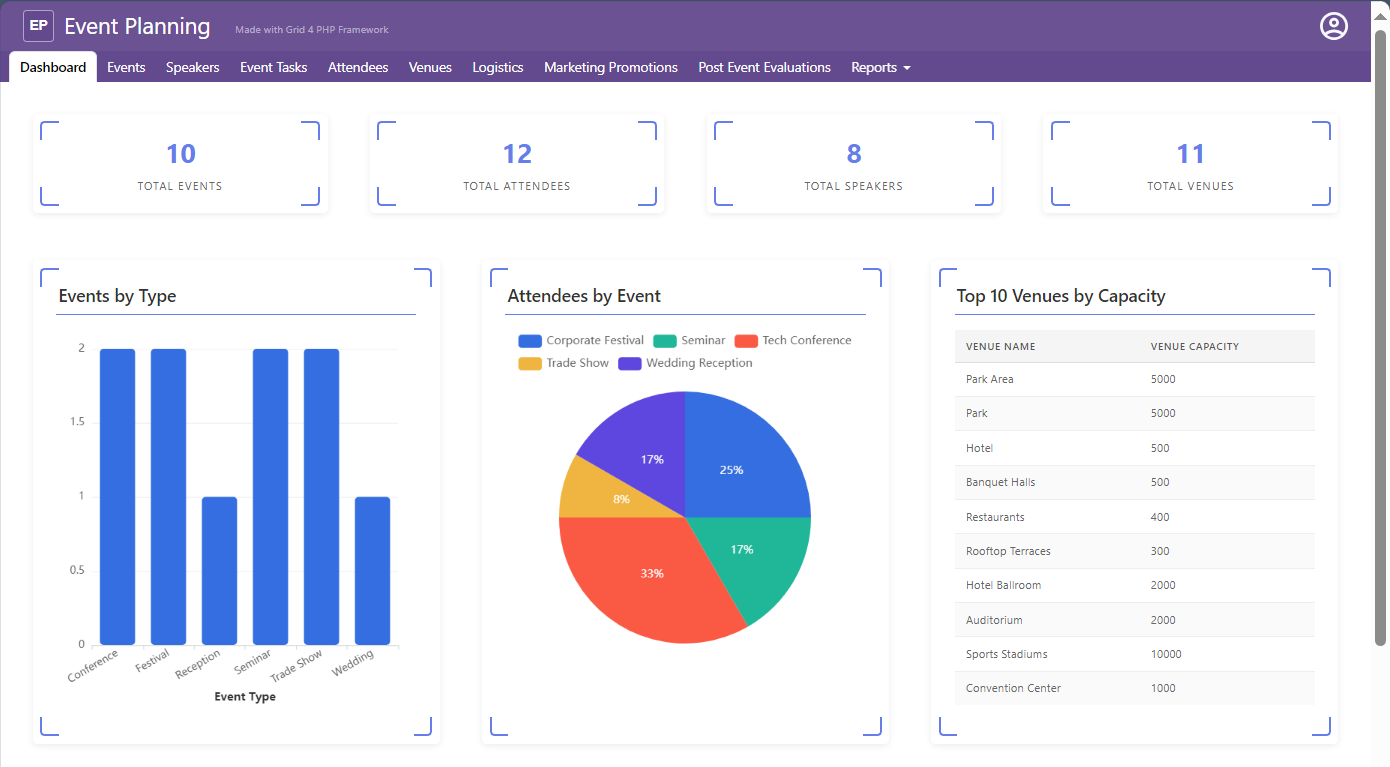
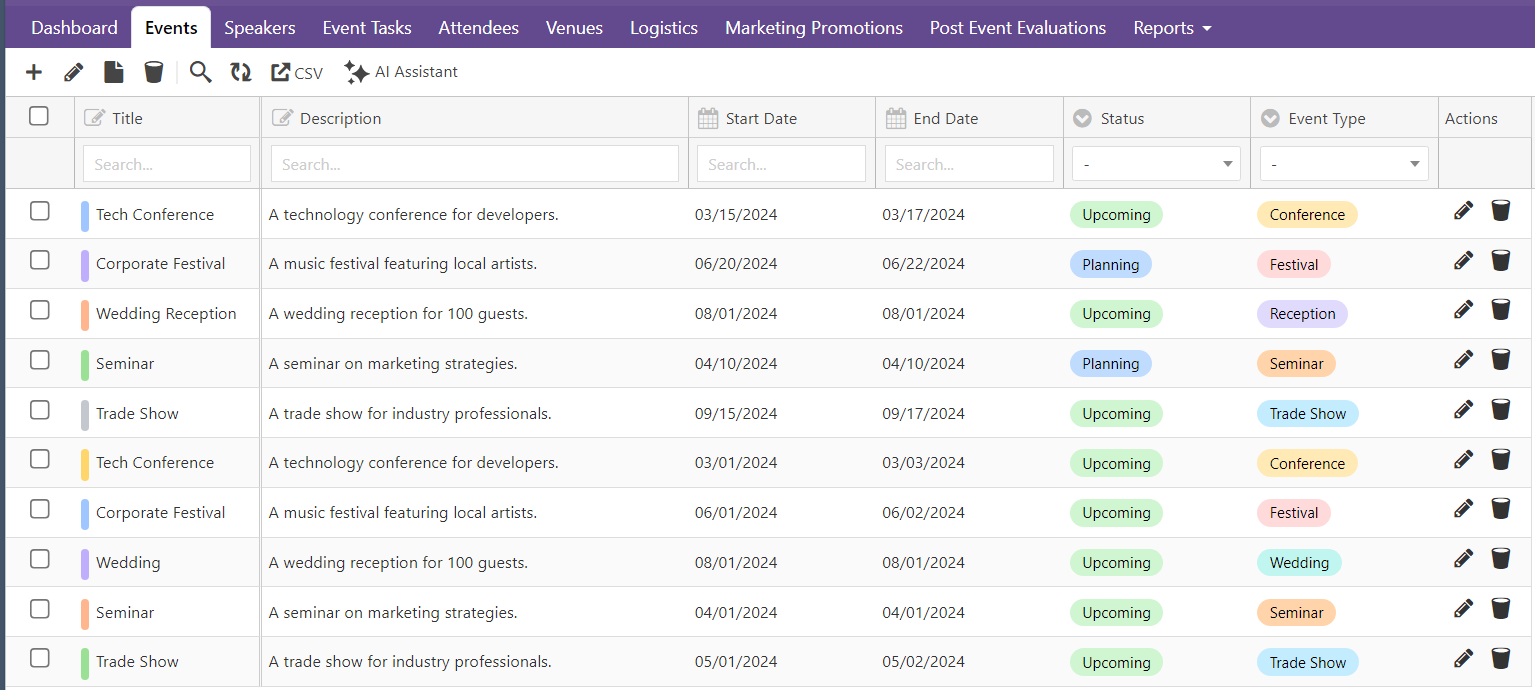
- Event Planning
- Employee Directory
- Expense Tracker
- Donation Management
- Sales CRM
- Inventory Management
- Patient Management
Each template is pre-configured with these features, ready to use and easy to customize for your specific needs.
Building on Excellence
These new features complement the robust capabilities already included in every template:
- Dashboard with KPI boxes for at-a-glance insights
- Multiple visualization options including bar charts, pie charts, and tables
- Powerful data grid with full CRUD operations
- Secure authentication and role-based authorization
- User management system built-in
- Mobile responsive design throughout
Get Started Today
Ready to experience these powerful new features? Visit our Template Center to explore all available templates and see these enhancements in action.
Why Upgrade or Get Started Now?
Faster Development: Build sophisticated applications in a fraction of the time Better User Experience: Your users will love the intuitive popup navigation and rich text editing Professional Quality: Enterprise features without enterprise development costs Future-Proof: Regular updates and enhancements keep your applications modern Excellent Support: Our team is ready to help you succeed
Next Actions
Active License Subscription customers can get free upgrade using this link.
Ready to elevate your applications? Explore our templates or contact our support team to learn how these features can transform your next project.
Start building better applications today with GridPHP templates!
Application Templates just got better!
We’re excited to announce major enhancements to our GridPHP application templates! Our template center has been completely revamped with powerful new features that make building data-driven applications faster and more intuitive than ever before.
What’s New?
Our enhanced templates now come packed with enterprise-grade features that transform how you visualize and interact with your data. Whether you’re building a CRM, inventory system, or any data-intensive application, these improvements will supercharge your development workflow.
Enhanced Dashboard with KPI Boxes
Get instant insights at a glance with our new KPI (Key Performance Indicator) boxes. The dashboard now features:
- Real-time metrics displayed in clean, modern KPI cards
- At-a-glance overview of your most important business metrics
- Color-coded indicators for quick status assessment
- Responsive layout that adapts beautifully to any screen size
Perfect for executives and team members who need to monitor critical business metrics without diving into detailed reports.
Advanced Data Visualizations
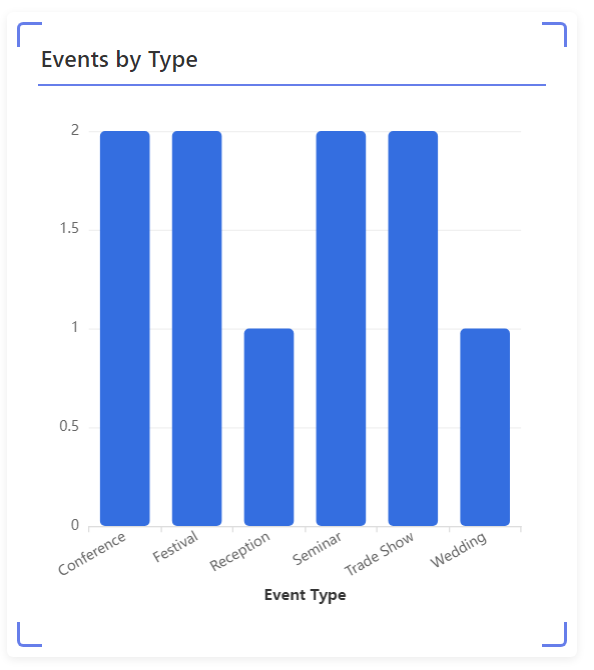
Interactive Bar Charts
Transform your data into compelling visual stories with our new bar chart visualization:
- Dynamic filtering and drill-down capabilities
- Customizable colors and themes
- Hover tooltips for detailed information
- Export functionality for presentations and reports
Ideal for comparing performance across categories, tracking trends over time, or analyzing sales by region.
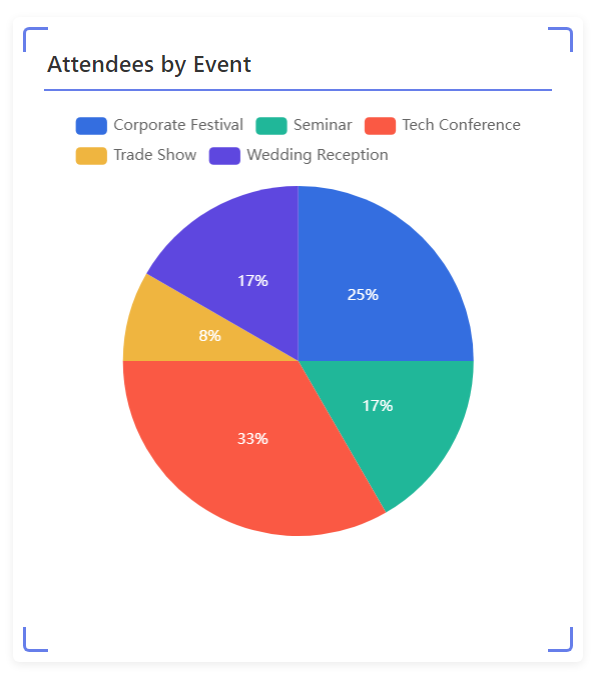
Beautiful Pie Charts
Our pie chart visualization makes it easy to understand proportions and distributions:
- Interactive segments with click-to-filter functionality
- Percentage labels for clear data representation
- Legend with color coding for easy reference
- Smooth animations that engage users
Perfect for showing market share, budget allocation, or any categorical data distribution.
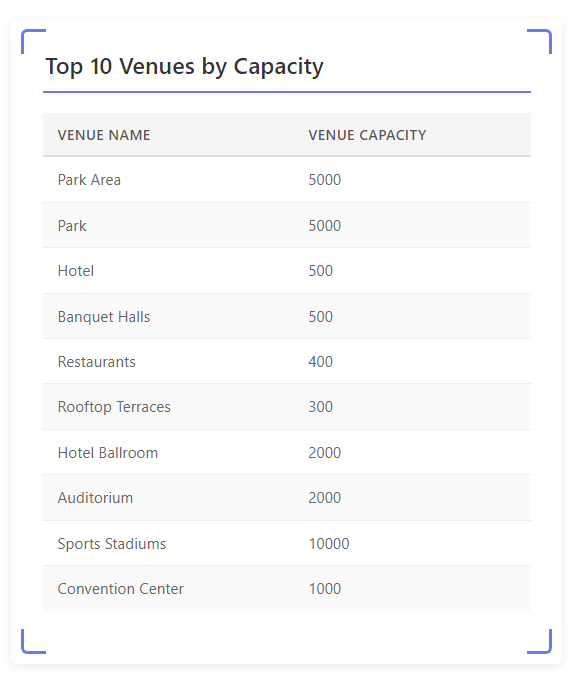
Comprehensive Table Visualizations
Need a detailed view? Our enhanced table visualization offers:
- Sortable columns for quick data organization
- Advanced filtering options
- Pagination for large datasets
- Inline editing capabilities
- Export to Excel/CSV functionality
Great for users who need to work with detailed data records and perform in-depth analysis.
Powerful Data Grid
At the heart of every template is our enhanced data grid that gives you complete control:
- CRUD operations (Create, Read, Update, Delete) out of the box
- Advanced search and filtering
- Bulk operations for efficiency
- Inline and form editing modes
- Column reordering and resizing
- Conditional formatting for visual cues
Master your data with a grid that’s both powerful and user-friendly.
Organized Reports Menu
Navigate your application effortlessly with our new reports menu structure:
- Hierarchical organization of reports and dashboards
- Quick access to frequently used views
- Custom menu items for your specific needs
- Icon support for visual navigation
- Collapsible sections to reduce clutter
Everything you need is just a click away, making navigation intuitive for all users.

Built on Solid Foundations
All these enhancements build upon the core features that have made GridPHP templates so popular:
- Secure authentication system with login protection
- Role-based authorization for granular access control
- User management built-in
- Mobile responsive design that works on all devices
- Easy setup with loads of customization flexibility
Ready to Get Started?
Our enhanced templates are available now and include:
- Event Planning
- Employee Directory
- Expense Tracker
- Donation Management
- Sales CRM
- Inventory Management
- Patient Management
Each template comes with all these new features pre-configured and ready to customize for your specific needs.
Why Choose GridPHP Templates?
- Save Development Time: What would take weeks to build from scratch is ready in minutes. Focus on customization instead of building basics.
- Professional Quality: Get enterprise-grade features without enterprise-level development costs.
- Outstanding Support: Our technical support team is here to help you succeed with quick, helpful responses.
- Easy Customization: Start with a working application and modify it to match your exact requirements.
Get Your Template Today
Visit our Template Center to explore all available templates and see these enhancements in action. Each template comes with complete source code, documentation, and our commitment to your success.
Transform your data into insights. Build applications that users love. Get started with GridPHP templates today!
Questions about our templates? Contact our support team – we’re here to help you choose the right template and get started quickly.
Handle Many-to-Many relations in GridPHP
Hello,
In this post, we’re showing a practical example, handling data of companies with multiple business interests.
The Problem
You have companies. Each company has multiple interests (Software Development, Cloud Computing, etc.). Each interest can belong to multiple companies.
The traditional approach means:
- 3 tables with complex JOINs
- Custom forms for managing relationships
- Manual junction table handling
- Hours of debugging
A Simpler Way
Here’s a working example using GridPHP that handles all the complexity automatically.
Database Setup
-- Three simple tables
CREATE TABLE companies (
  id int PRIMARY KEY AUTO_INCREMENT,
  name varchar(255),
  address varchar(255),
  phone varchar(15)
);

CREATE TABLE ref_interest (
  id int PRIMARY KEY AUTO_INCREMENT,
  name varchar(45)
);

CREATE TABLE company_interest (
  company_id int,
  interest_id int,
  PRIMARY KEY (company_id, interest_id)
);
The Smart Query
Instead of showing relationships in separate rows, use GROUP_CONCAT:
$g->select_command = "SELECT c.id, c.name, c.address, c.phone,
                      GROUP_CONCAT(i.id) as interests
                      FROM companies c
                      LEFT JOIN company_interest ci ON c.id = ci.company_id
                      LEFT JOIN ref_interest i ON ci.interest_id = i.id
                      GROUP BY c.id";
This displays all interests for each company in a single row.
Auto-Handle Junction Table
The key is custom handlers that manage the junction table automatically:
function update_company_interest($data) {
    global $g;

    // Update company info
    $g->execute_query("UPDATE companies SET name=?, address=?, phone=? WHERE id=?",
                      array($data["params"]["name"],
                            $data["params"]["address"],
                            $data["params"]["phone"],
                            $data["id"]));

    // Delete old relationships
    $g->execute_query("DELETE FROM company_interest WHERE company_id=?",
                      array($data["id"]));

    // Insert new relationships
    if (!empty($data["params"]["interests"])) {
        $interest_ids = explode(",", $data["params"]["interests"]);
        foreach ($interest_ids as $interest_id) {
            $g->execute_query("INSERT INTO company_interest VALUES (?, ?)",
                            array($data["id"], $interest_id));
        }
    }
}
Multi-Select Interface
Add a searchable multi-select dropdown:
$col["edittype"] = "select";
$col["editoptions"] = array(
    "value" => $g->get_dropdown_values("SELECT id, name FROM ref_interest"),
    "multiple" => true,
    "dataInit" => "function(el){
        jQuery(el).select2({tags:true});
    }"
);
The Result
Users see a grid with companies and their interests. When editing:
- Click edit on any row
- Multi-select dropdown appears with search
- Select/deselect interests
- Save – junction table updates automatically
Time saved: 3 days → 1 hour
Use This Pattern For:
- Users ↔ Roles
- Products ↔ Categories
- Students ↔ Courses
- Posts ↔ Tags
Complete Code
Full working example: GitHub Gist
Bottom line: Many-to-many relationships don’t need to be complicated. Use GROUP_CONCAT for display, custom handlers for the junction table, and a multi-select UI for user-friendly management.
Have a many-to-many challenge? This pattern works for any scenario with 3 tables and complex relationships.
Next Actions
Active License Subscription customers can get free upgrade using this link.
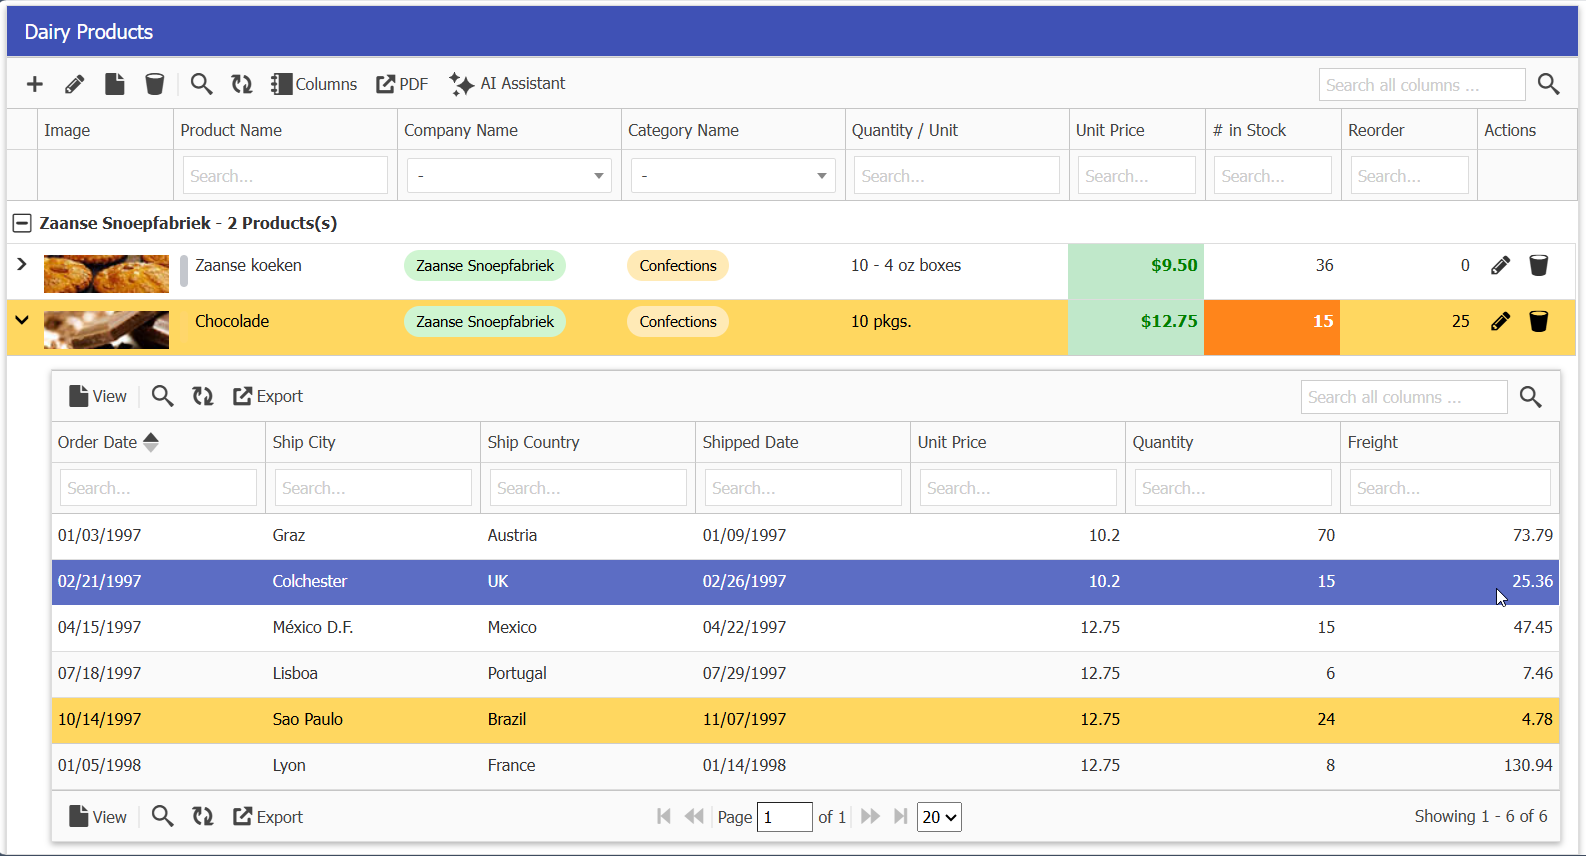
Expand Row to View Details
Hello,
Exciting update for PHP developers! GridPHP now allows you to view row data by expanding the row grid, making data exploration more intuitive and user-friendly.
The working demo can be checked online and inside full version package in demos/master-detail/subgrid-view.
Live Demo: Click Here
Next Actions:
- Download Free version (for evaluation purpose)
- Buy Full Featured version License
Active License Subscription customers can get free upgrade using this link.